
Setting up your rate
Earned needs to know how much you earn per hour to convert prices into time.
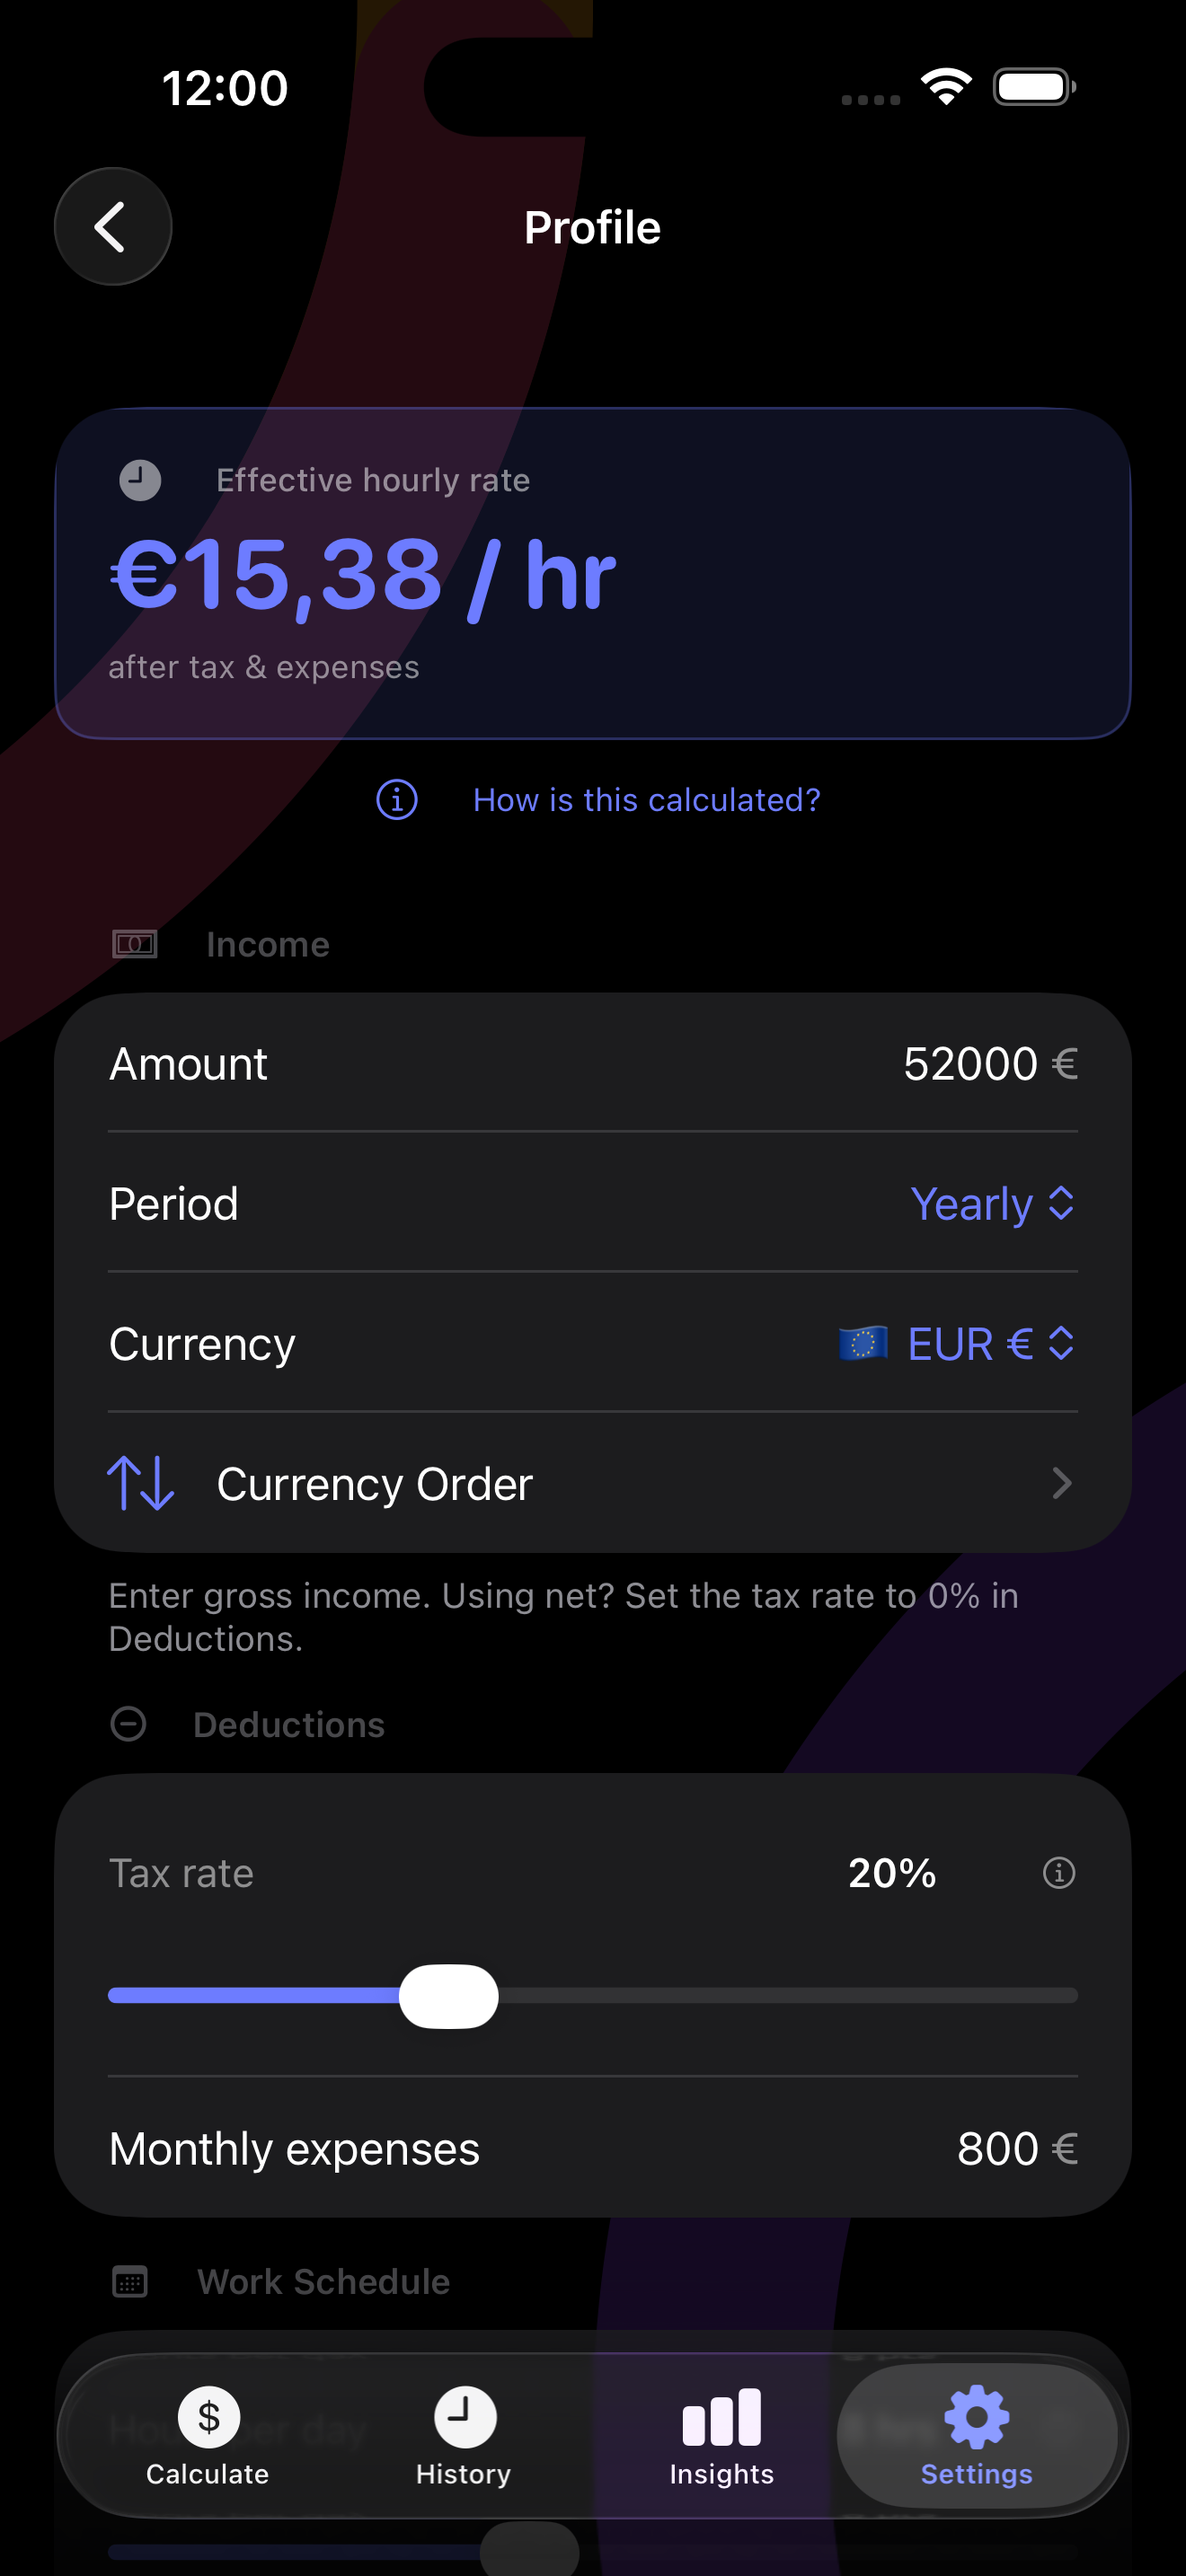
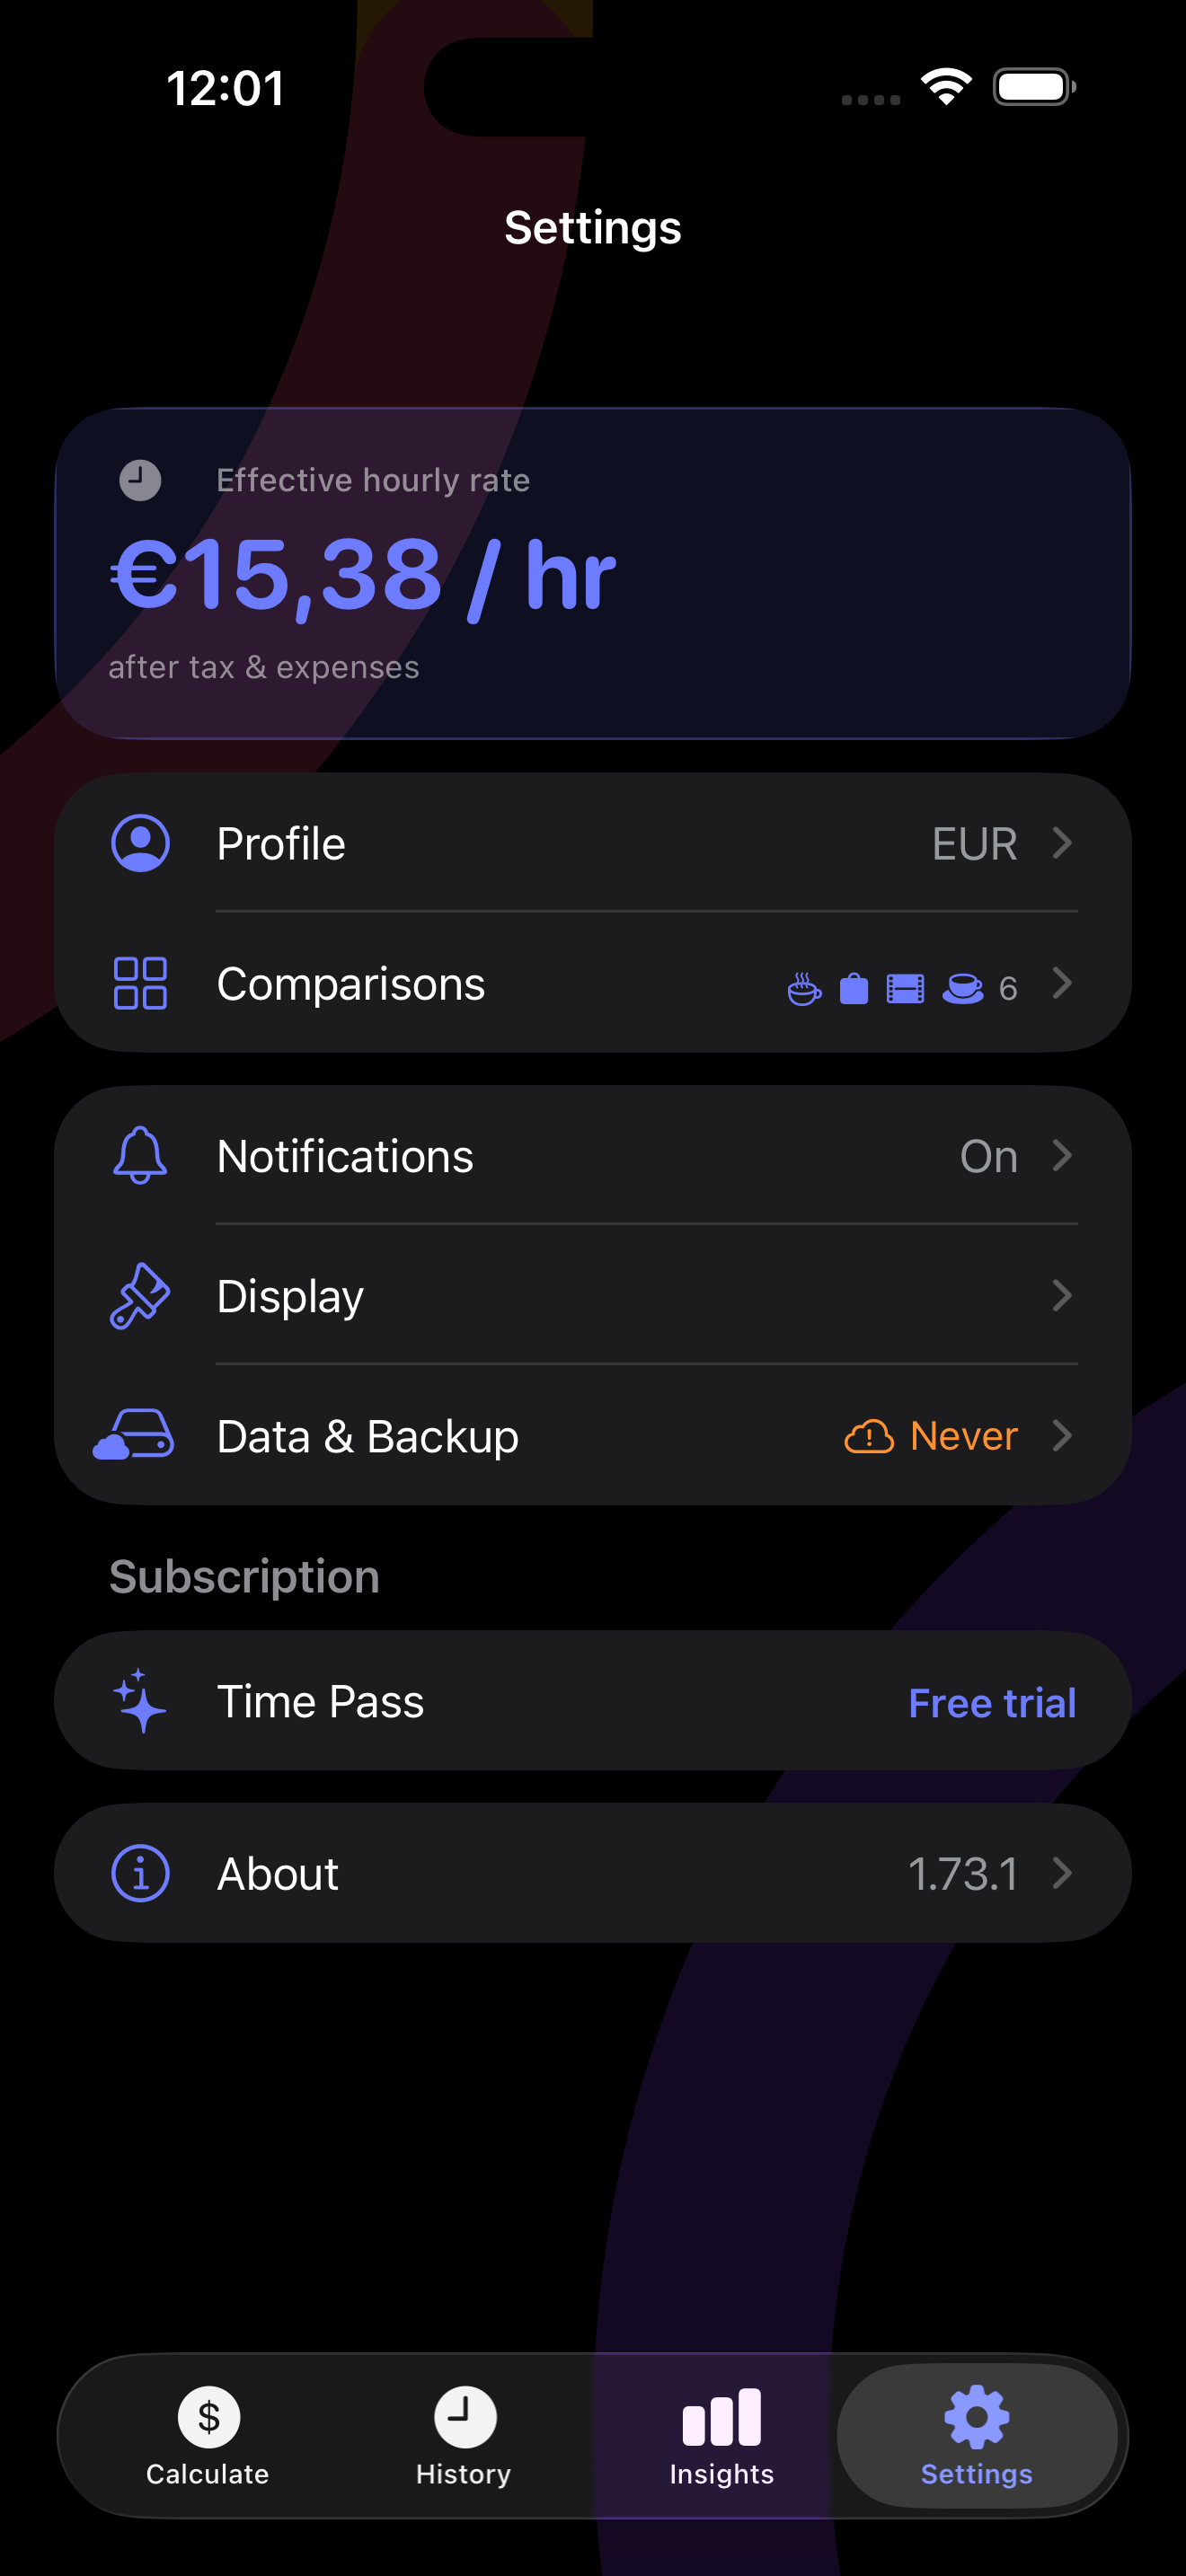
- Open the Settings tab (gear icon, bottom right).
- Tap Profile and enter your income amount.
- Set the period — hourly, daily, weekly, monthly, or annual. Earned converts it to an hourly rate automatically.
- Optionally set your tax rate and monthly expenses so the effective rate reflects your actual take-home.
Your effective hourly rate is always shown at the top of the Profile screen — that's the number every calculation uses.
Enter your gross income and set your tax rate — Earned will calculate your net hourly rate for you. Or enter your net income directly and leave the tax rate at 0%.
Either approach works. What matters is that the final hourly rate shown in Settings reflects what you actually take home per hour.
Yes, any time. Go to Settings and update your income. Your existing purchase history will remain unchanged — only new calculations will use the updated rate.
If your entered expenses (tax, deductions) exceed your income, Earned shows a warning — it means the resulting hourly rate would be zero or negative, which makes the converter useless. Reduce your deductions or increase your income until the effective hourly rate shown in Settings is a realistic number.
Using the Calculator
Convert any price into hours of your work in seconds.
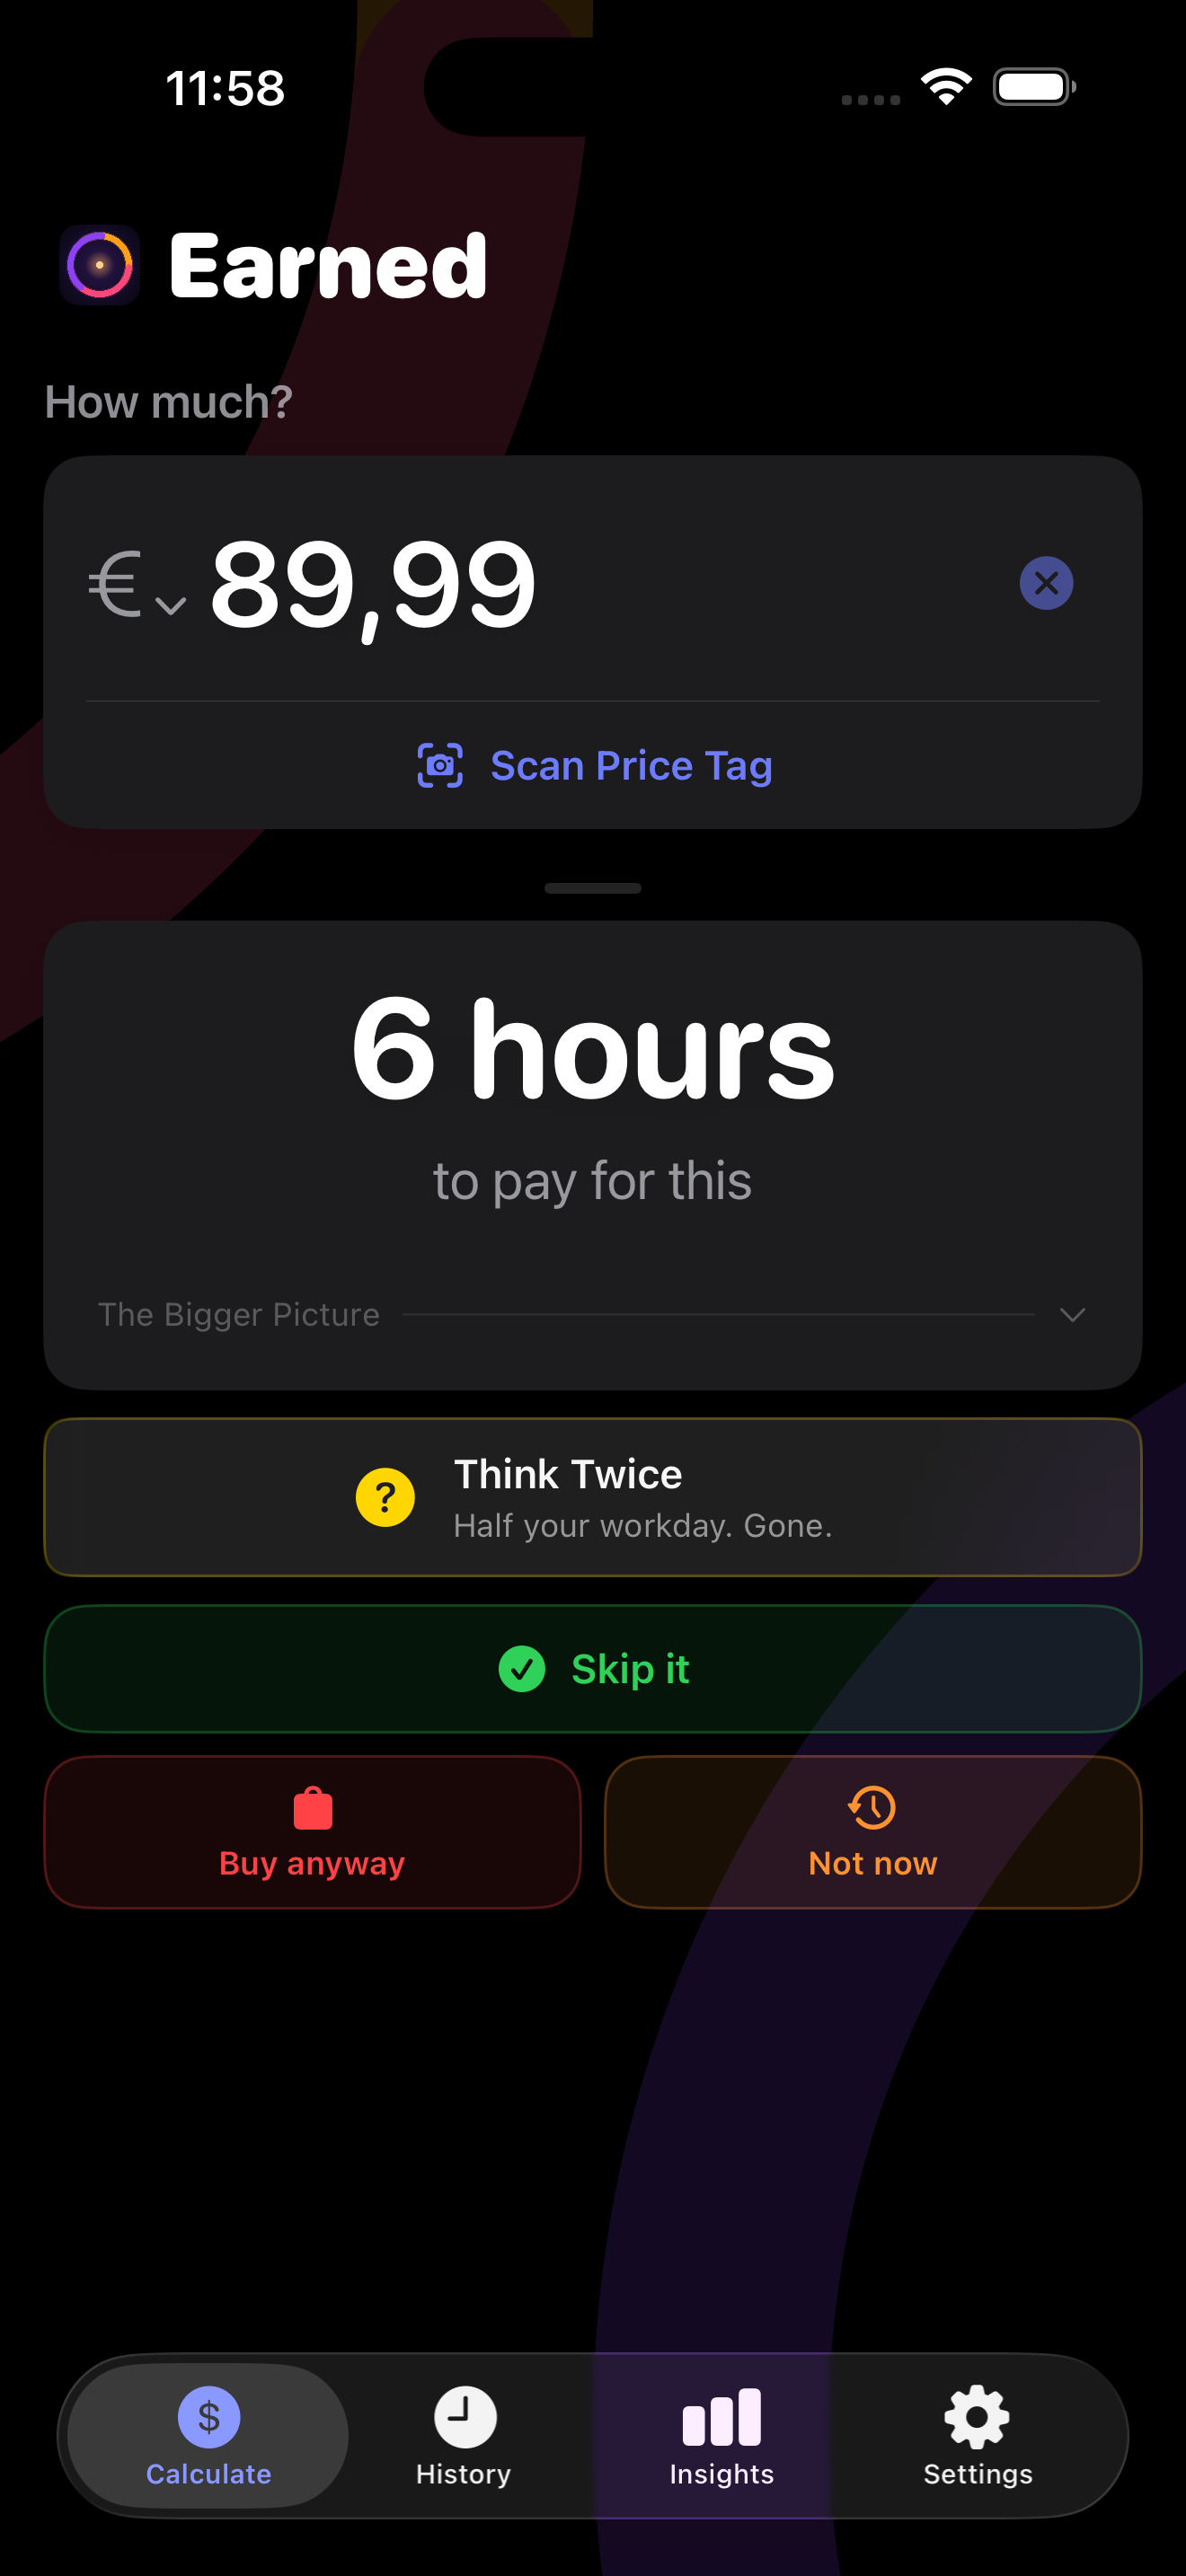
- Open the Calculator tab (first icon at the bottom).
- Type any price — the result in hours appears instantly.
- Tap Skip it, Buy anyway, or Not now — your decision saves instantly and the screen resets after a short countdown.
If the purchase crosses a time threshold, a coloured banner appears — like Sleep On It for anything costing more than a full workday. Customise these in Settings → Decision Rules.
After saving a purchase, you can rate it with a 👍 or 👎. Over time, Earned uses these ratings to show you patterns in your spending — what you genuinely valued and what you regret.
The 🔥 flame icon in the Calculator header tracks how many consecutive days you've used Earned. It increments once per day when you perform a calculation. Miss a day and the streak resets — it's a small nudge to build a mindful spending habit.
History & Decisions
Every saved calculation lives in History.
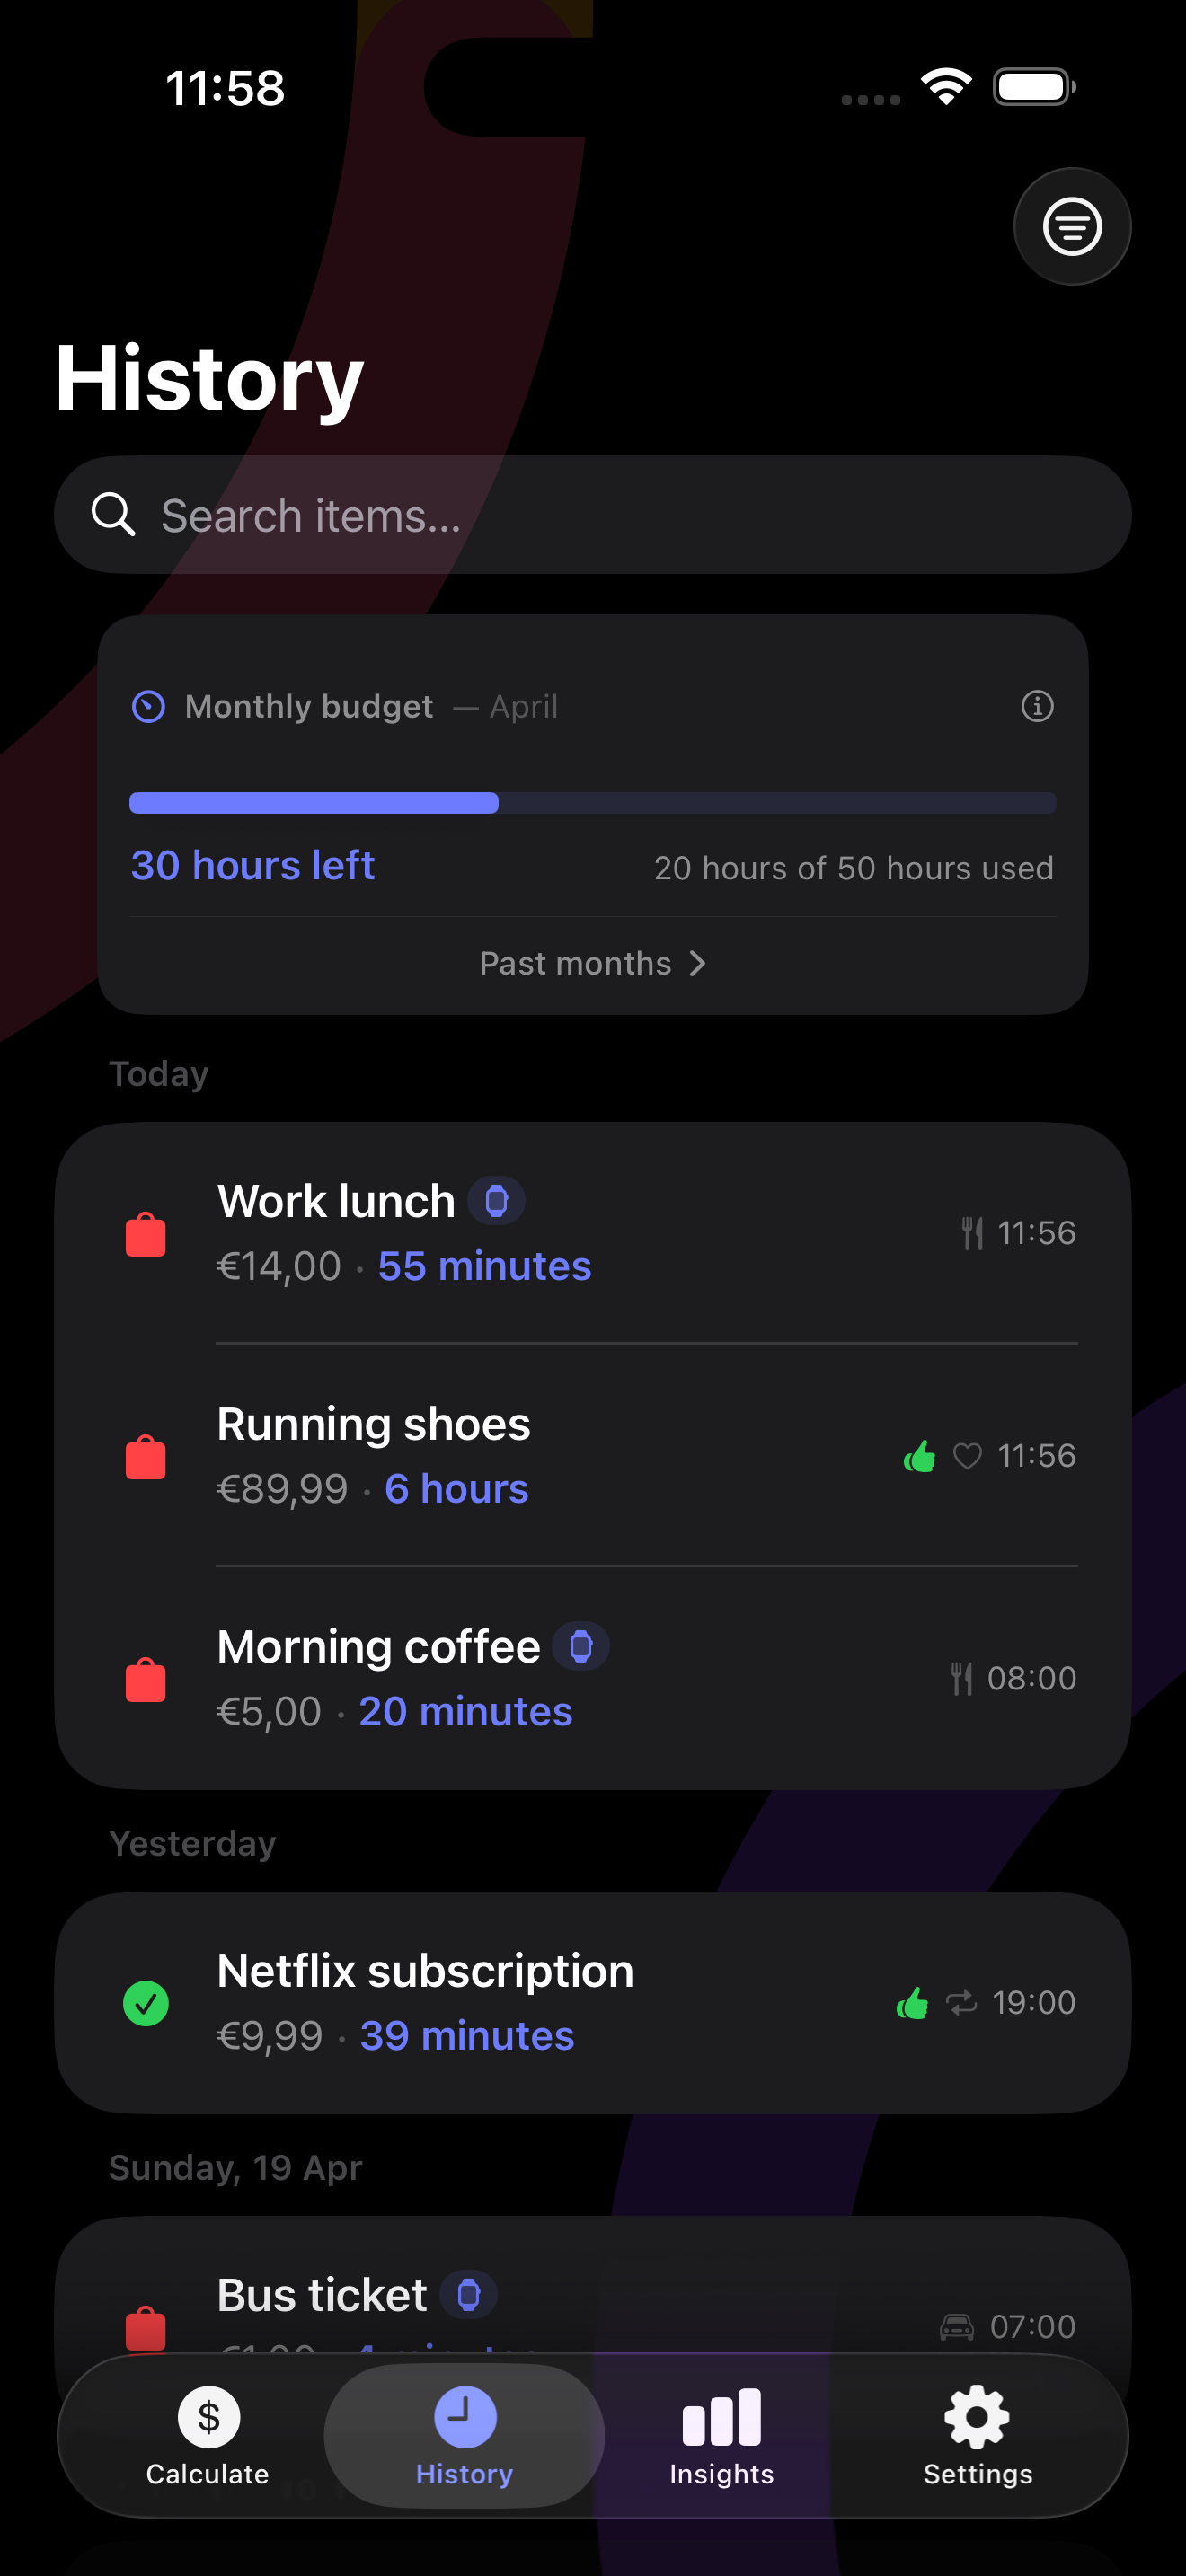
- Go to the History tab.
- Tap the filter icon (top right) to filter by Bought, Skipped, or Delayed.
- Use the search bar to find any item by name.
Tap any item to open it — you can edit the name, price, decision, or worth-it rating from there.
Yes — tap any item in History to open the edit sheet. You can change the name, price, decision, and worth-it rating. To delete it, swipe left on the row or use the delete button inside the edit sheet.
To export a backup:
- Go to Settings → Data & Backup.
- Tap Export Backup (JSON). iOS will prompt you to save or share the file.
To restore:
- Go to Settings → Data & Backup.
- Tap Import Backup (JSON) and select your file.
- Confirm — this replaces your current history entirely.
The Bigger Picture
More context behind every price — expanded from the result card.
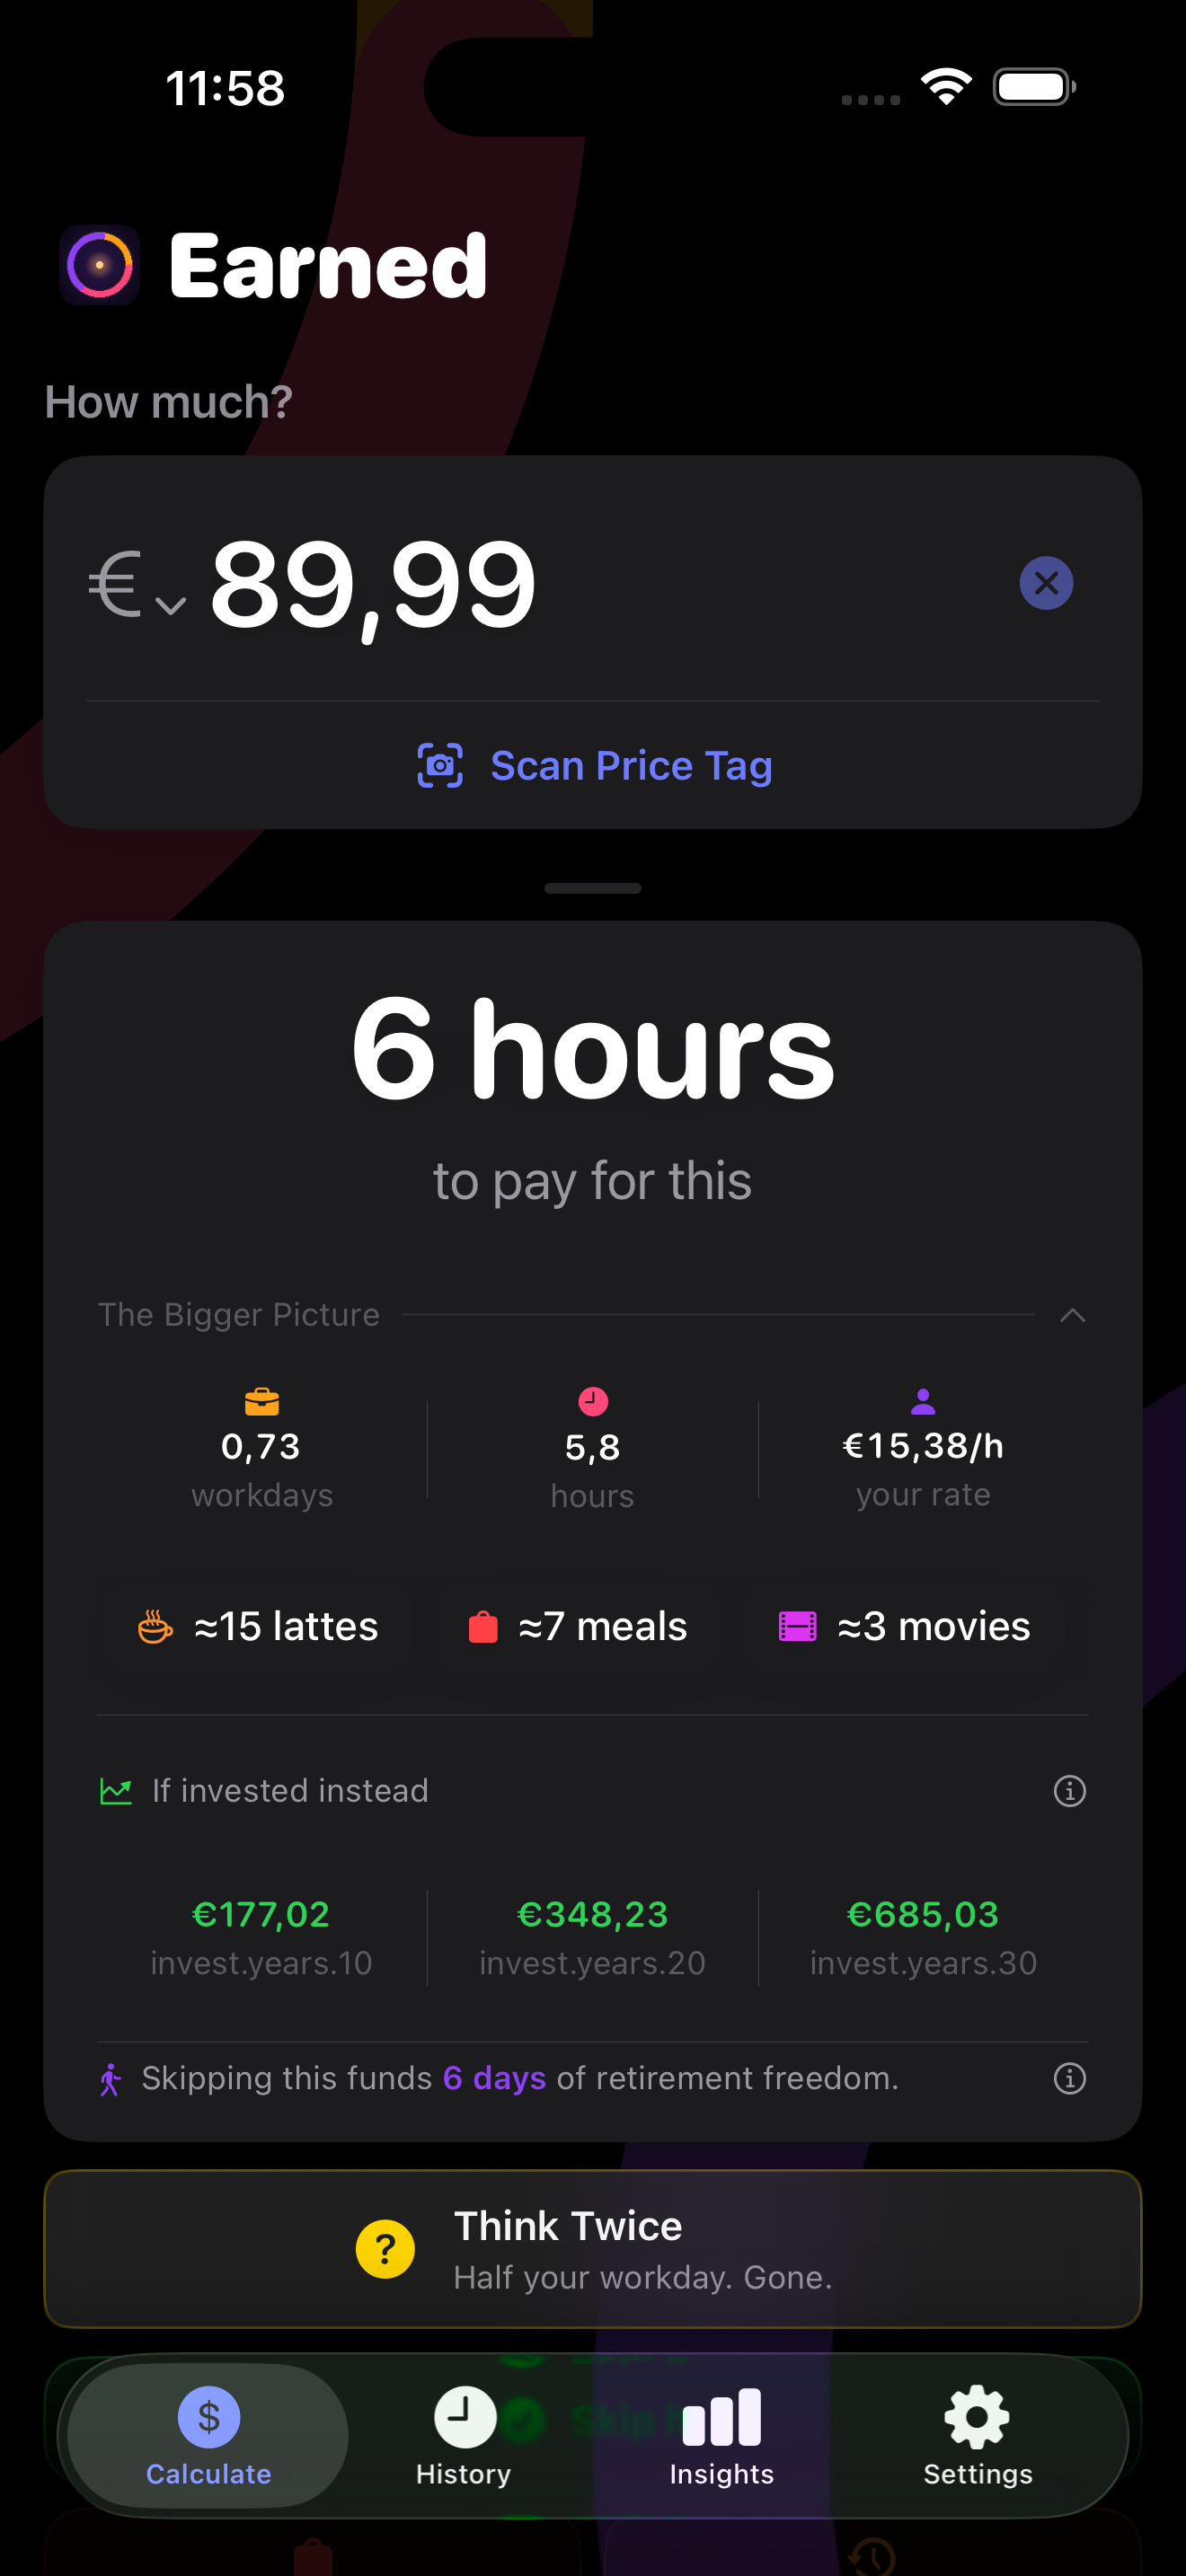
Tap "The Bigger Picture" on the result card to expand the full breakdown:
- Workdays, hours, your rate — the same price expressed three different ways.
- Comparisons — how many lattes, meals, or cinema tickets the price equals, based on the comparison categories in Settings.
- If invested instead — what the money could grow to at 7% annual return over 10, 20, and 30 years.
- Retirement freedom — how many years of retirement this single purchase represents, based on the 4% FIRE rule. Tap the ⓘ for the full explanation.
Spend Categories
Tag any purchase with a category so you can see where your time actually goes.
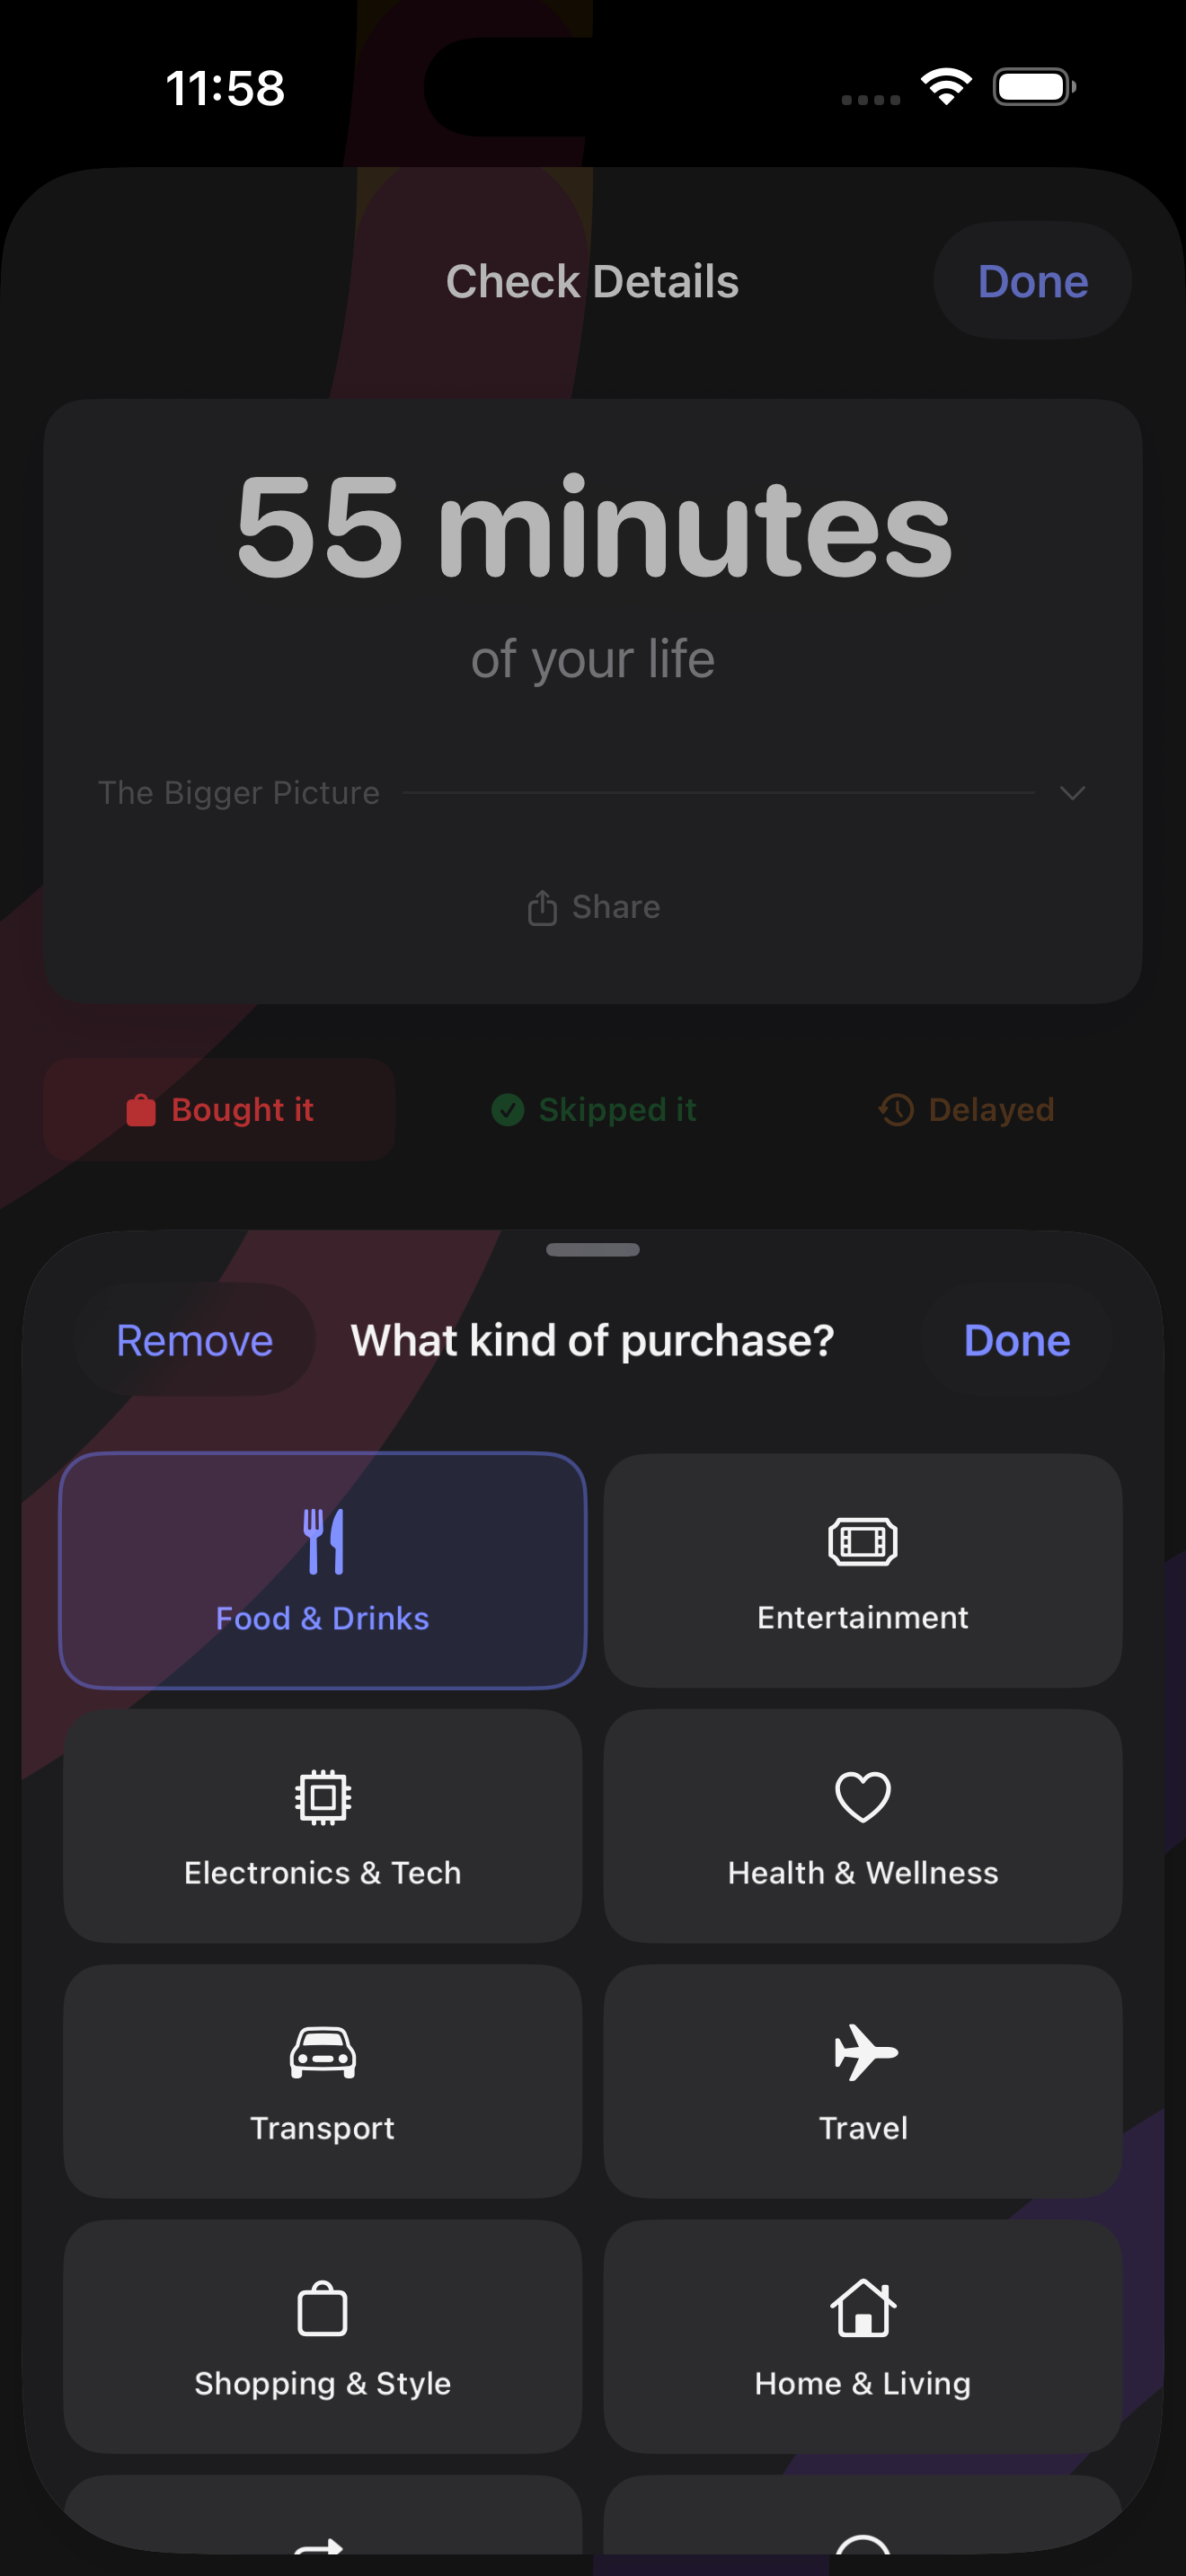
After you type an item name, Earned suggests a category automatically. Tap the chip below the decision buttons to confirm the suggestion or pick a different one. You can also set or change a category any time from History — tap any entry to edit it.
There are 10 categories to choose from: Food & Drinks, Entertainment, Electronics & Tech, Health & Wellness, Transport, Travel, Shopping & Style, Home & Living, Subscriptions, and Other.
Yes — tap the filter icon in the top-right corner of the History tab and pick a category. Only items with that tag will show.
Budget Tracker
Set a monthly spending limit in hours.
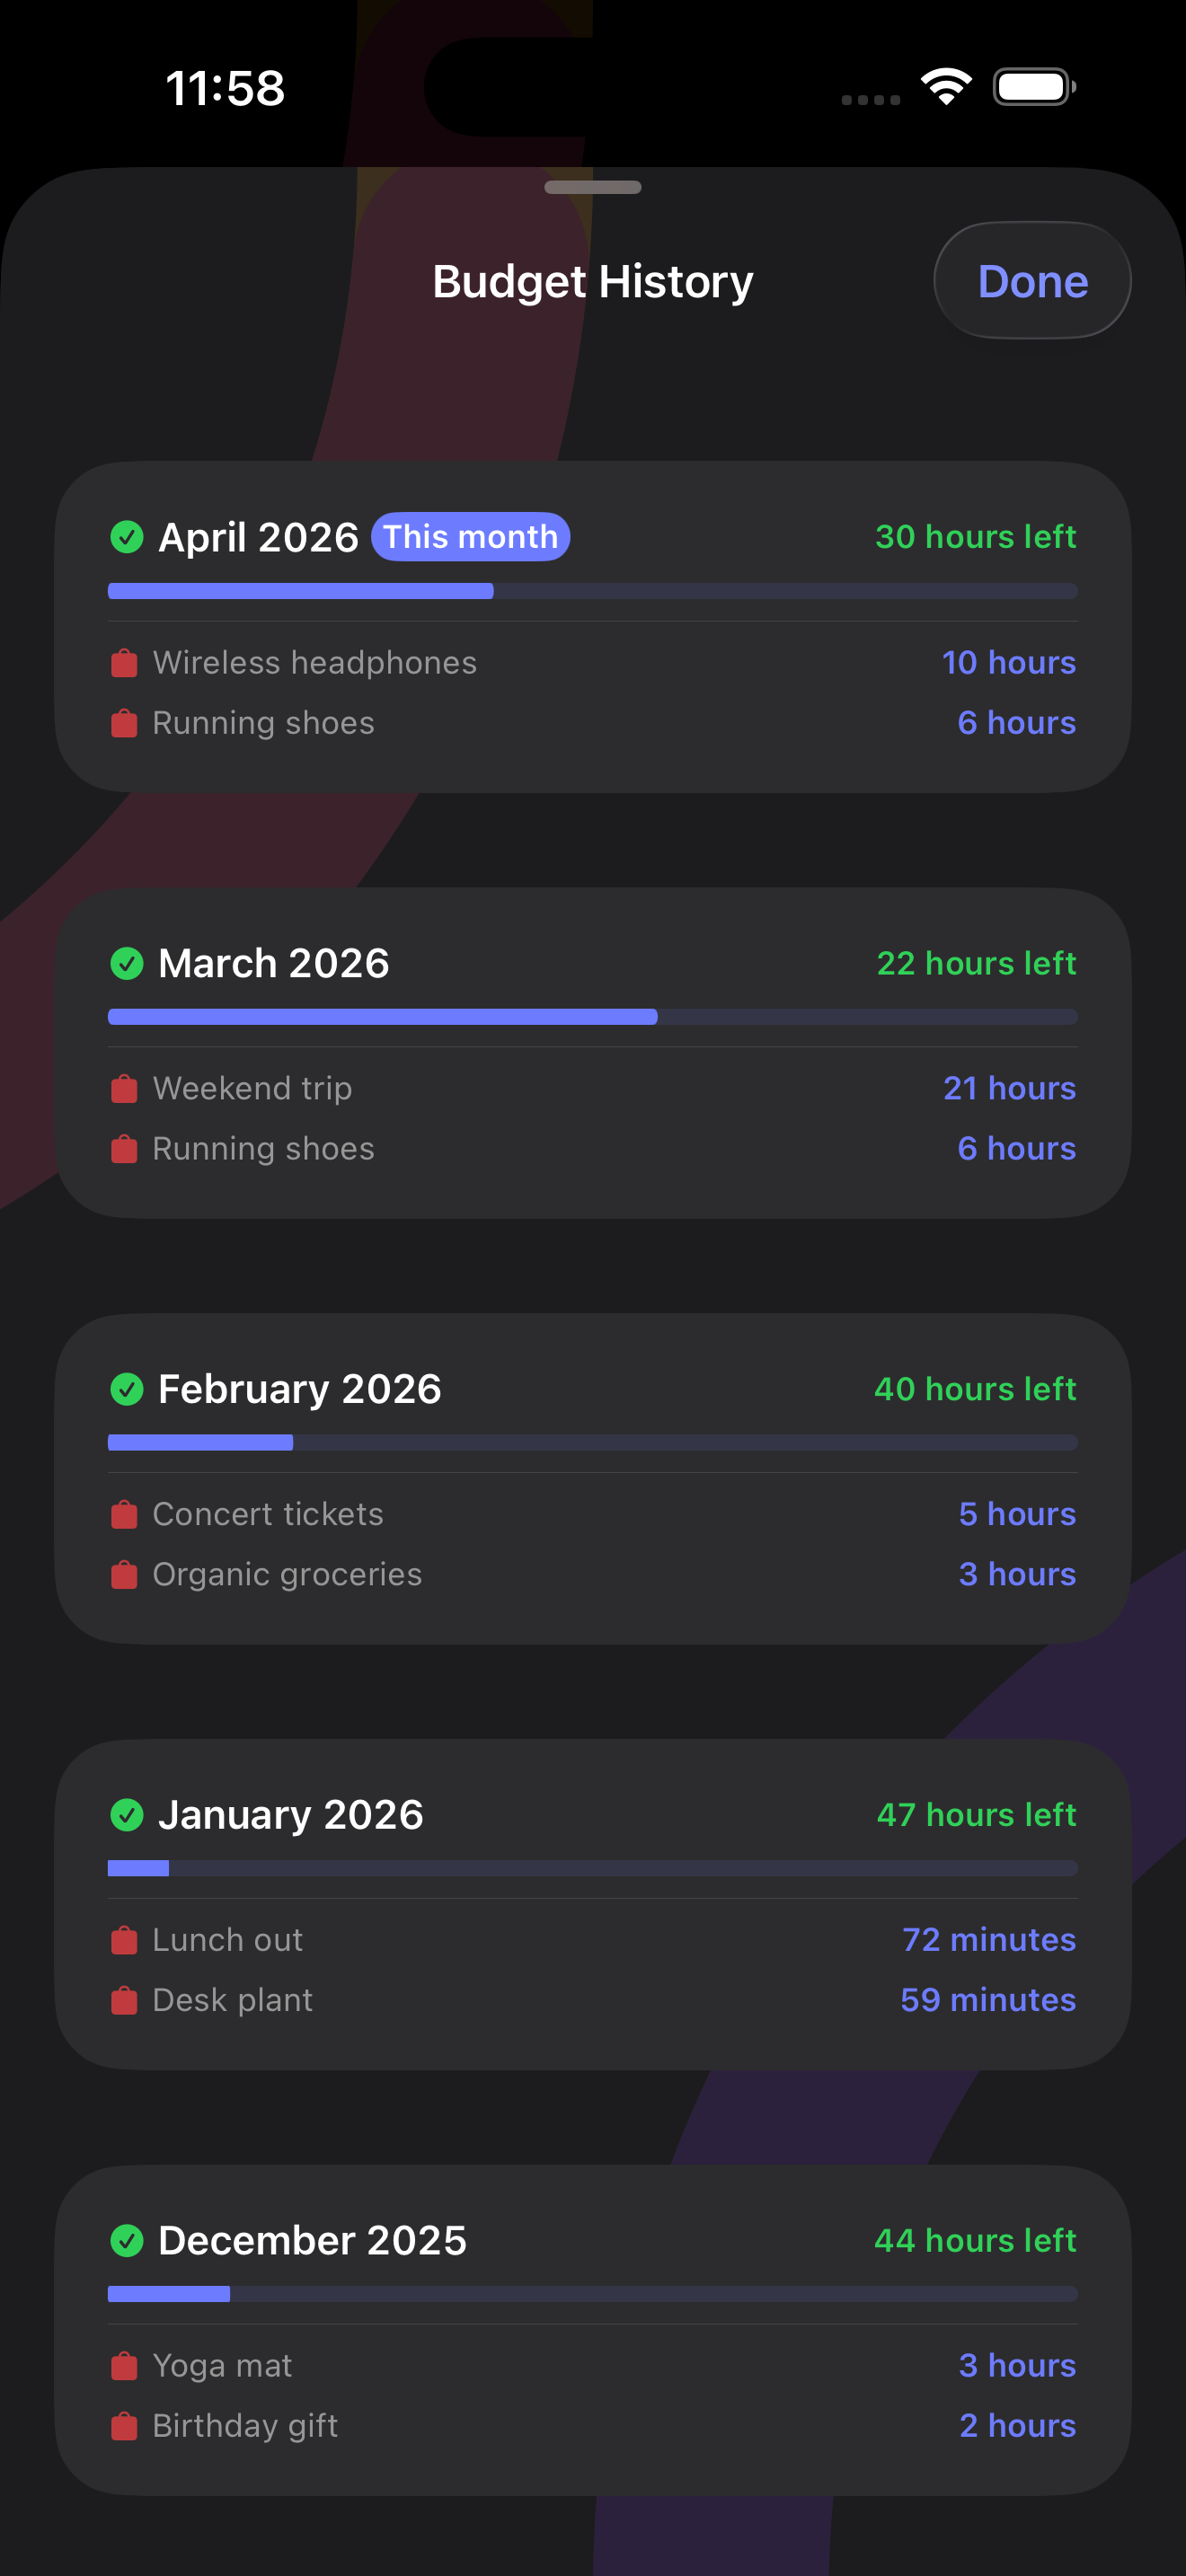
Enable the budget in Settings and set a limit in hours per month (e.g. 20 hours). Earned tracks all items you mark as Bought and shows your progress against the limit with a colour-coded bar — green when you're on track, orange as you approach the limit, red when you've exceeded it.
Yes, automatically on the first of each month.
To review past months, tap Past months in the History tab — you'll see each month's total, how you tracked against your budget, and individual purchases that contributed.
Insights
Understand your spending patterns over time.
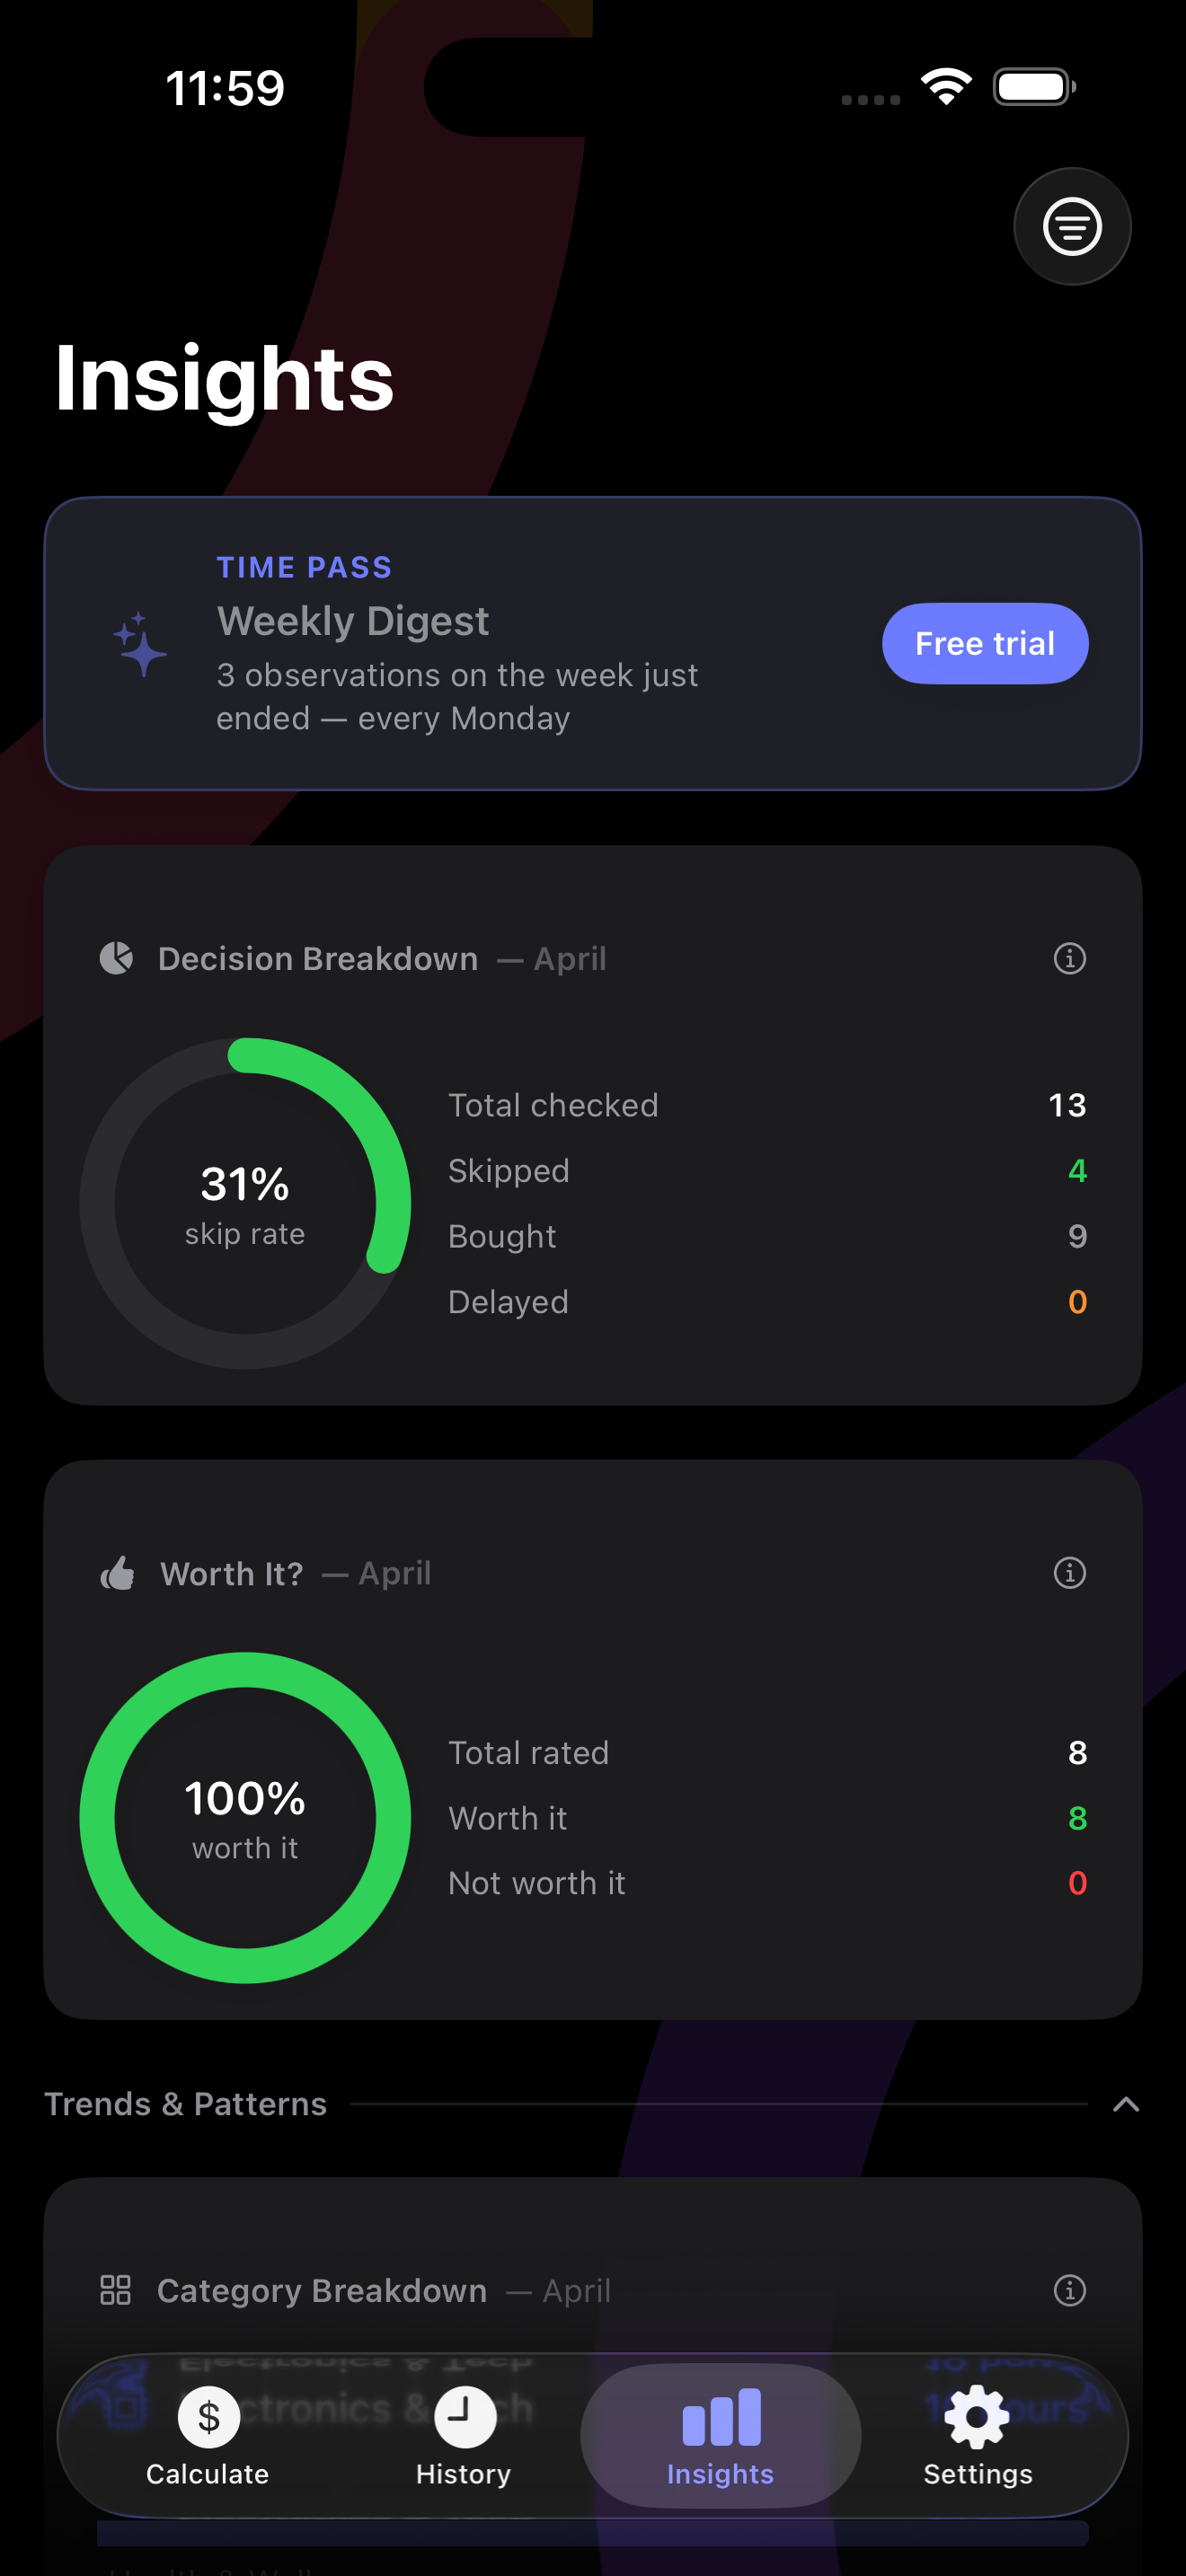
Insights analyses your purchase history and surfaces patterns: the time-cost of purchases you walked away from, skip rate, worth-it ratio, regret rate, top purchases, and weekly activity.
Cards appear as you accumulate more data — some require at least a few weeks of use to be meaningful. Use the scope picker (top right) to switch between This Month, 3 Months, This Year, and All Time.
When a purchase crosses a time threshold, a coloured banner appears on the result card giving you a nudge. There are five built-in rules:
- Quick Buy (under 30 min) — guilt-free zone, no need to think twice
- Worth Checking (1 h+) — an hour or more of your time; make sure it's worth it
- Think Twice (4 h+) — half a workday, worth a moment's pause
- Sleep On It (8 h+) — one or more full days of your life
- Big Decision (40 h+) — one or more full work weeks, needs serious thought
You can enable or disable individual rules in Settings → Decision Rules.
Category Breakdown
See where your time actually goes — a card in the Insights tab.
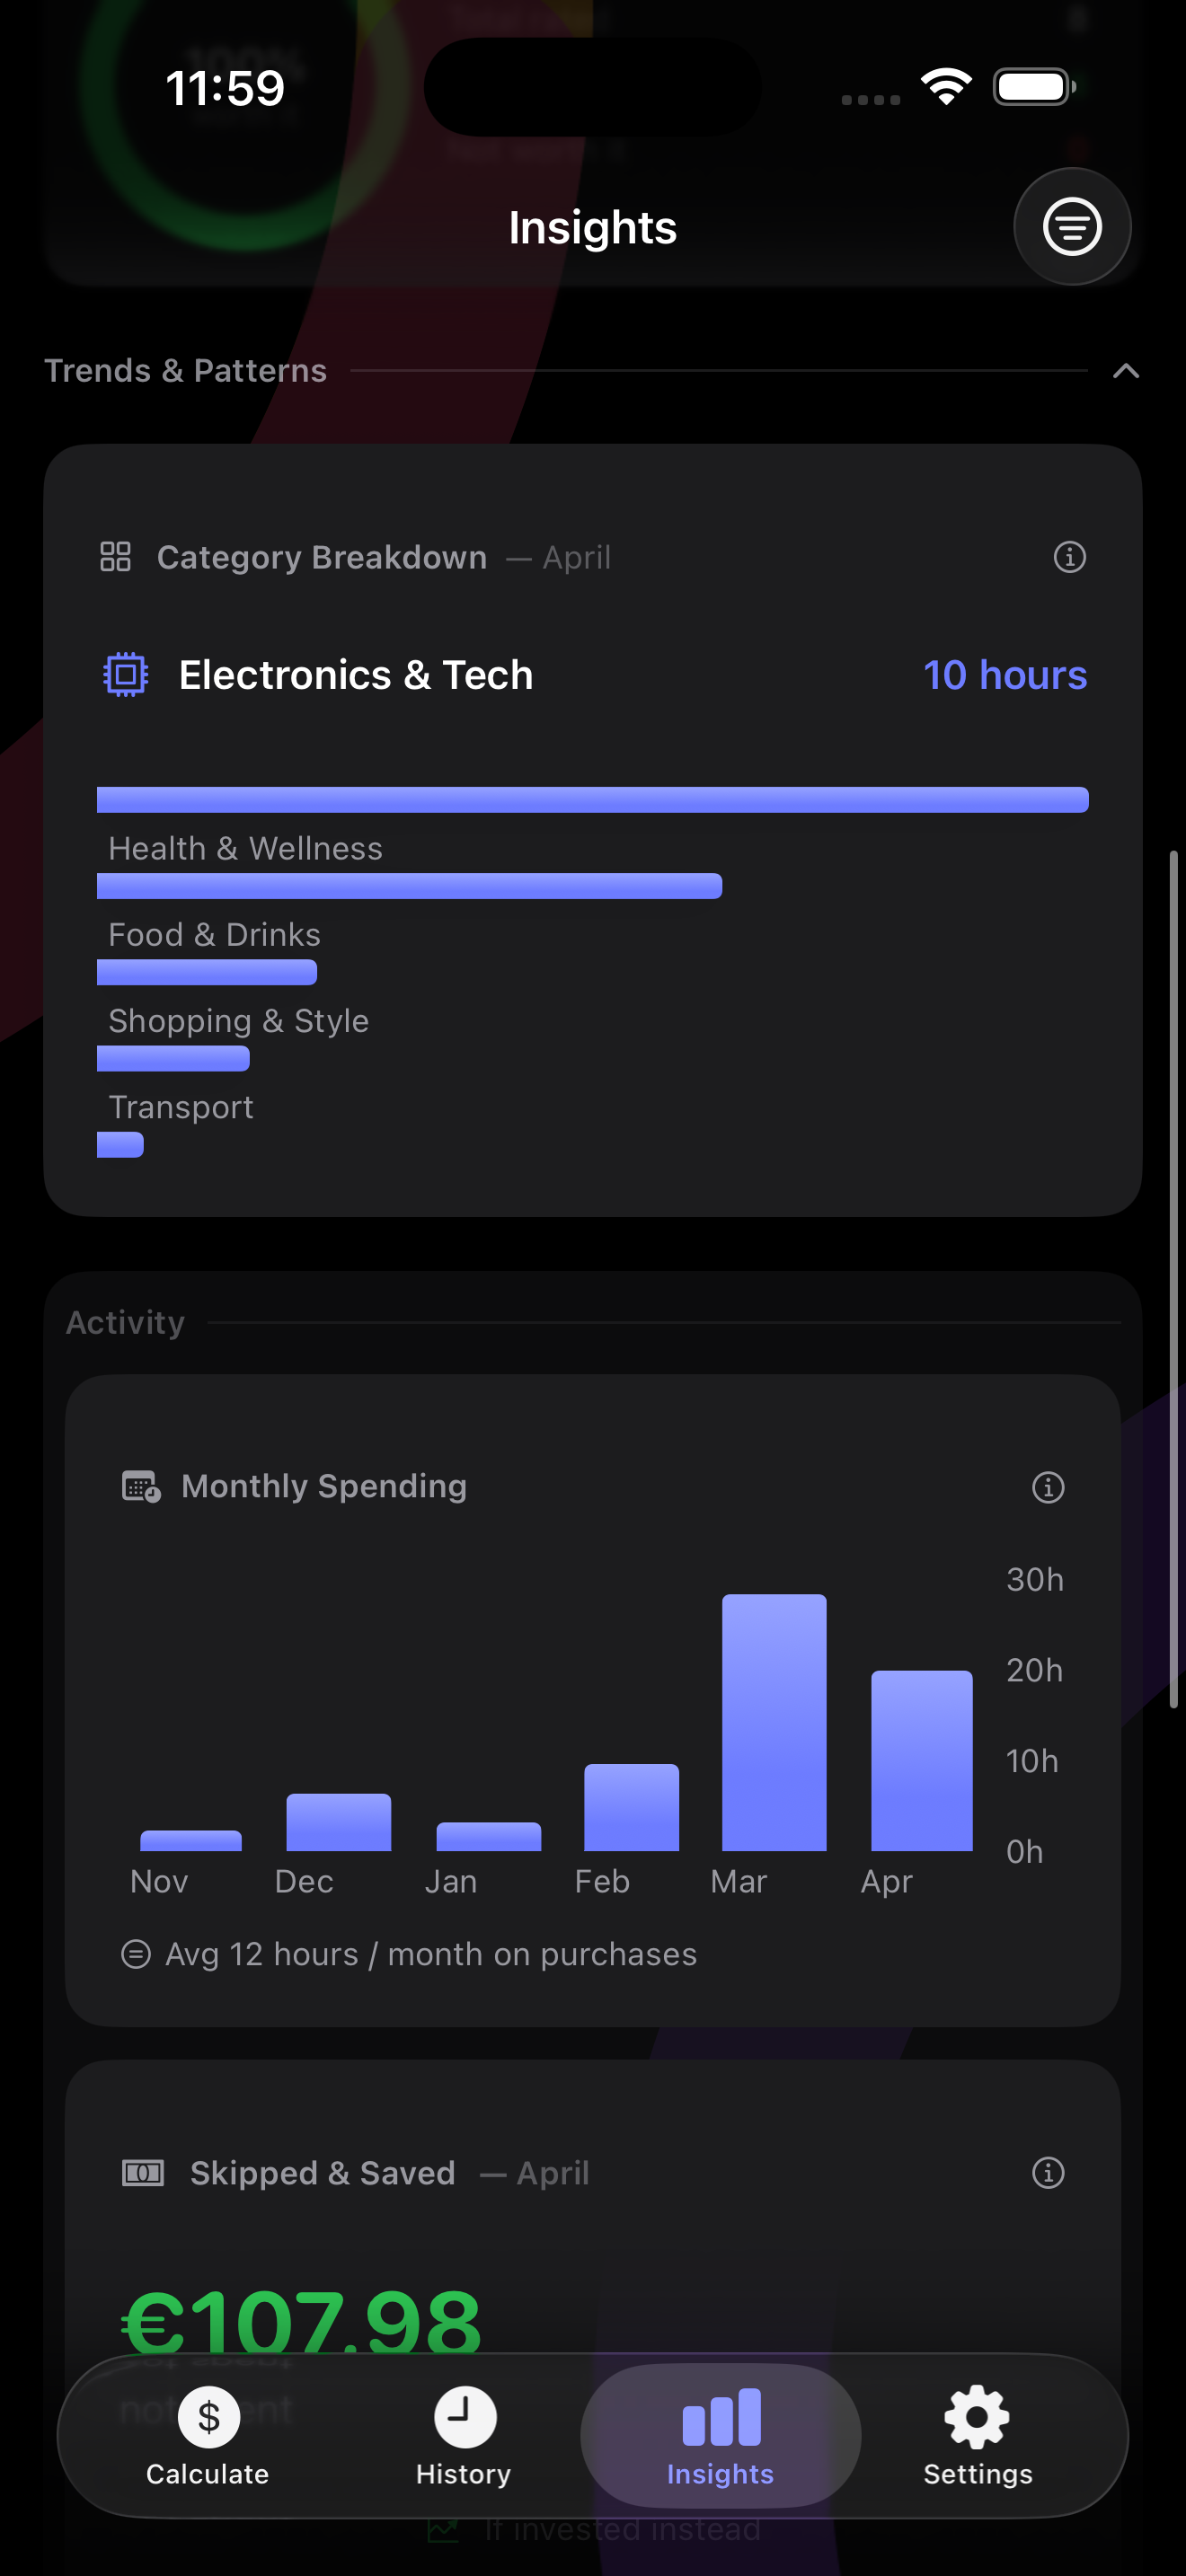
The card shows how many hours you've spent on bought items, broken down by spend category. Your biggest time sink is called out at the top. A bar chart ranks the rest — tail categories with near-zero hours are hidden to keep the signal clean.
Only items you actually bought count here — skipped items don't contribute. Use the scope picker at the top of Insights to filter by This Month, 3 Months, This Year, or All Time.
Price Scanner
Point your camera at any price tag, receipt, or menu — Earned reads it instantly.
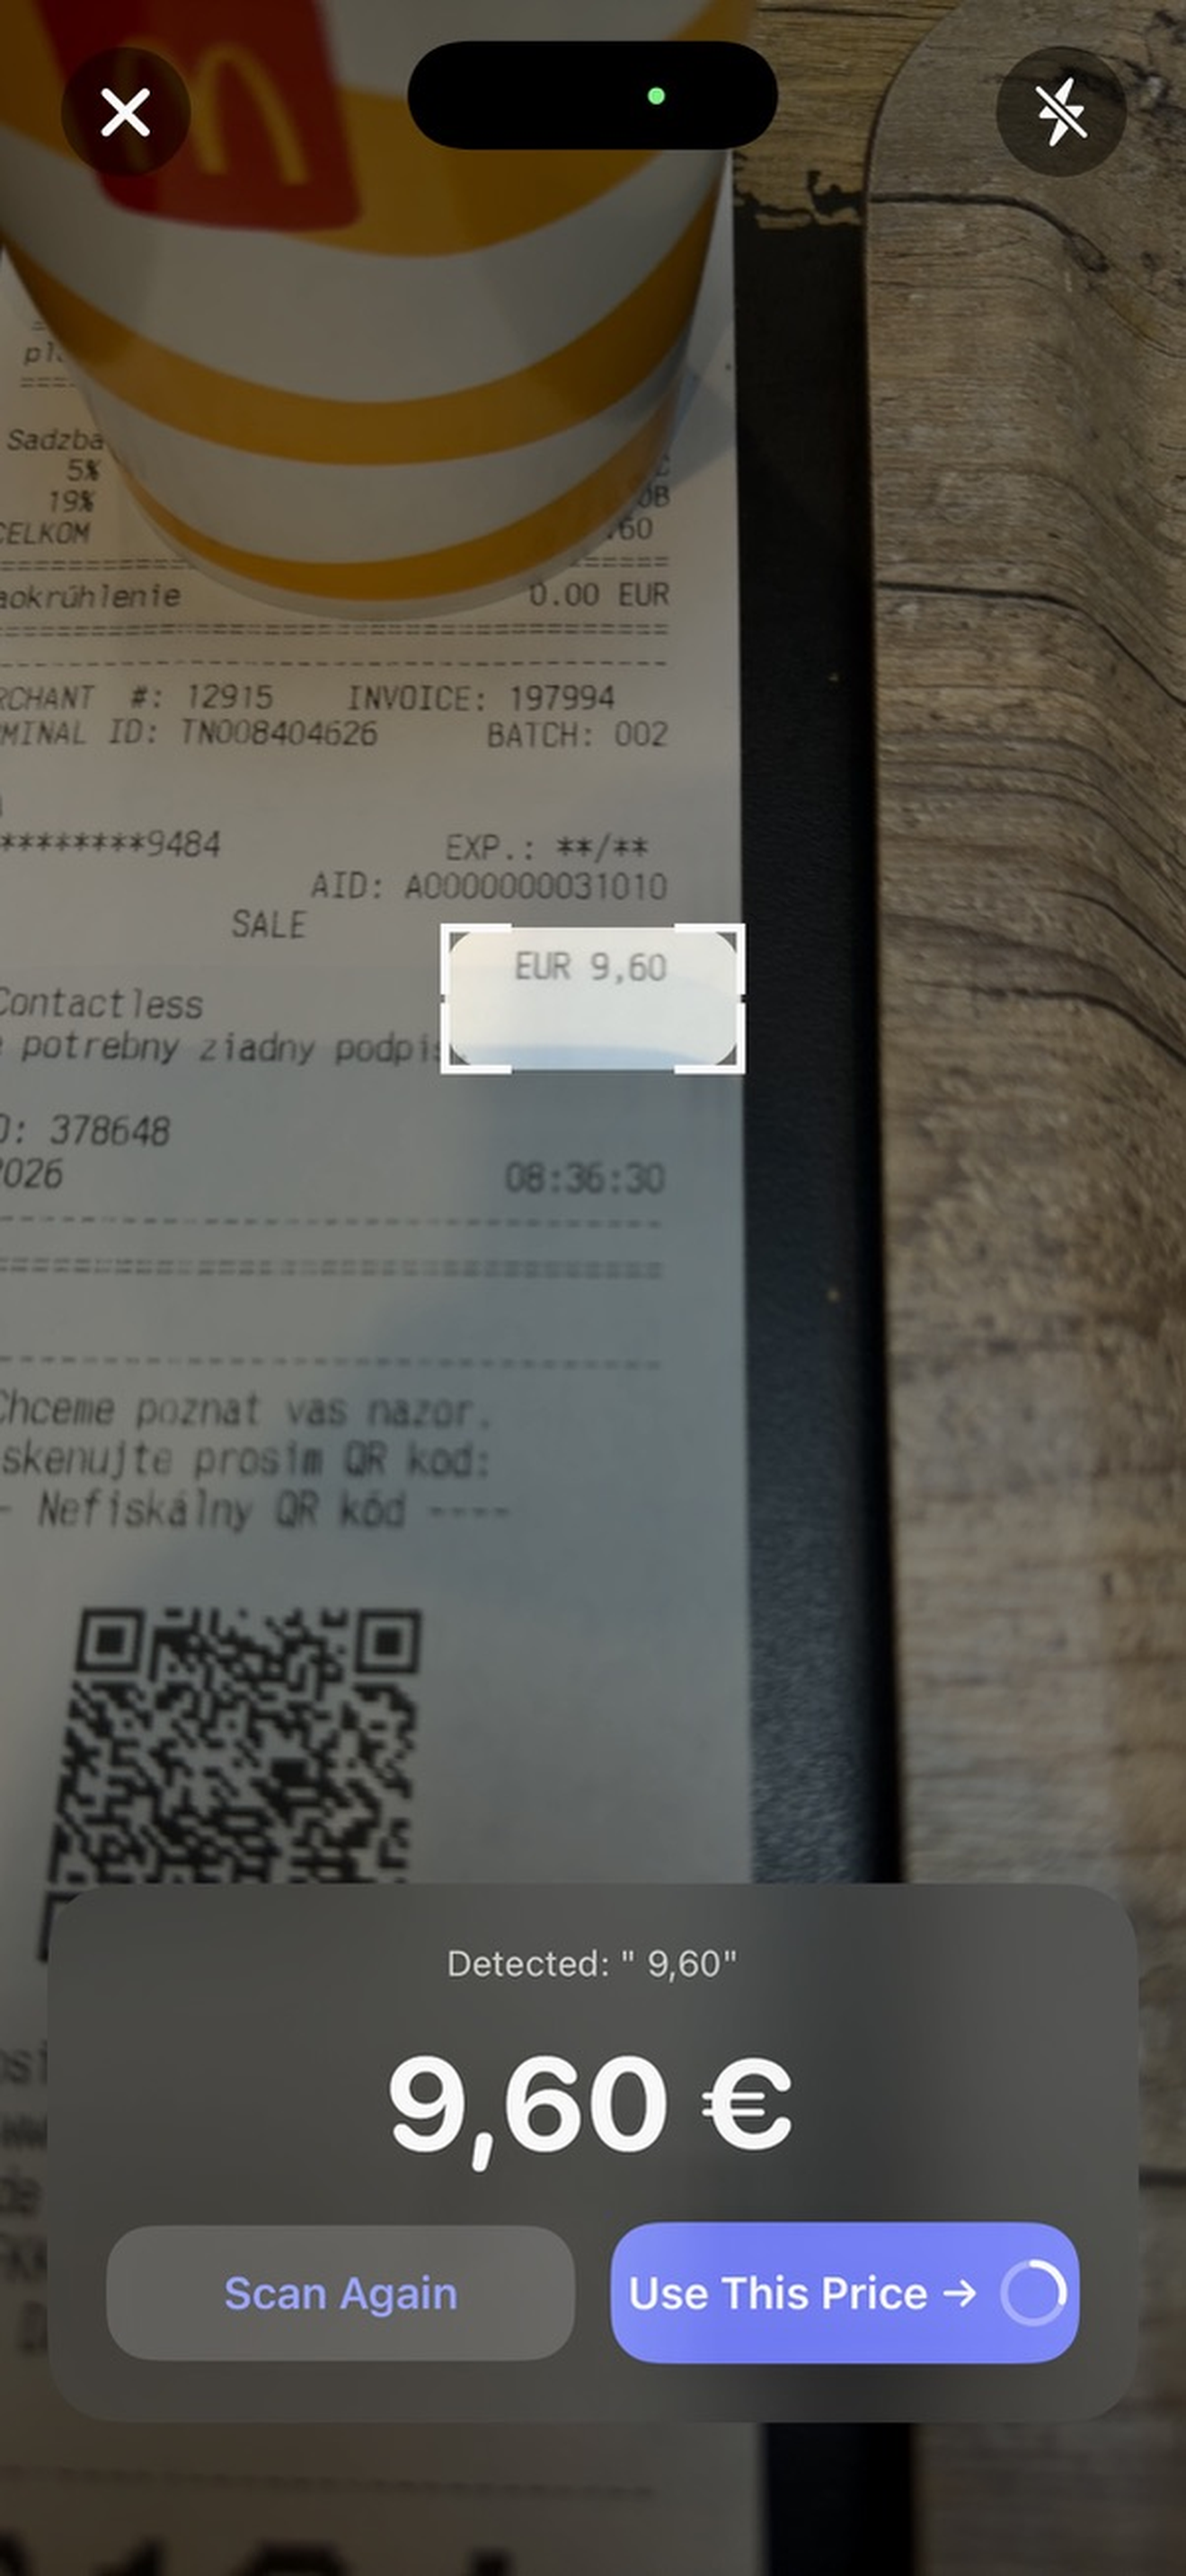
Tap the camera icon in the Calculator, point it at any price tag, shelf label, receipt, or screen, and Earned automatically detects the number. Tap to confirm and the price is filled into the Calculator instantly — no typing needed.
The scanner will warn you if the detected price appears to be in a different currency than your profile — so you're never silently comparing a euro price against a dollar rate. You can confirm or switch the currency before filling in the Calculator.
The scanner works on printed price tags, digital screens, receipts, menus, and labels — anything with a clearly visible number. It works best with high-contrast text on a stable surface. Dim lighting or blurry text may reduce accuracy.
Apple Watch
Check prices on your wrist — without taking out your phone.
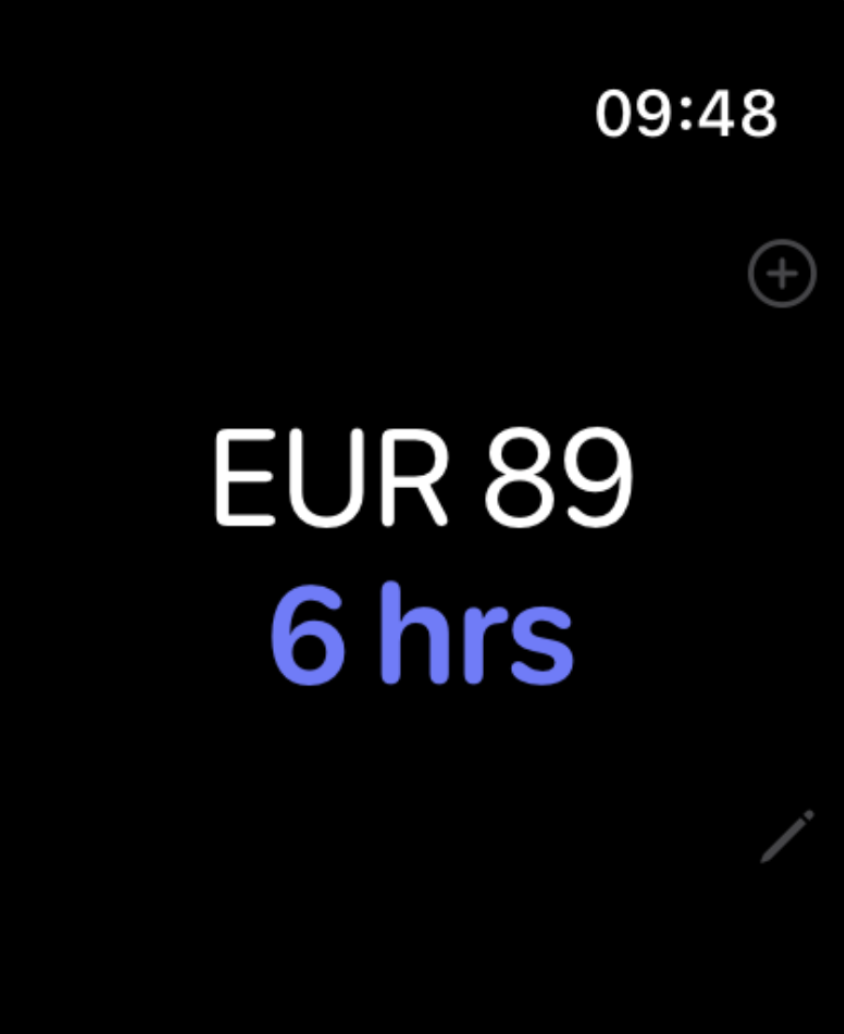
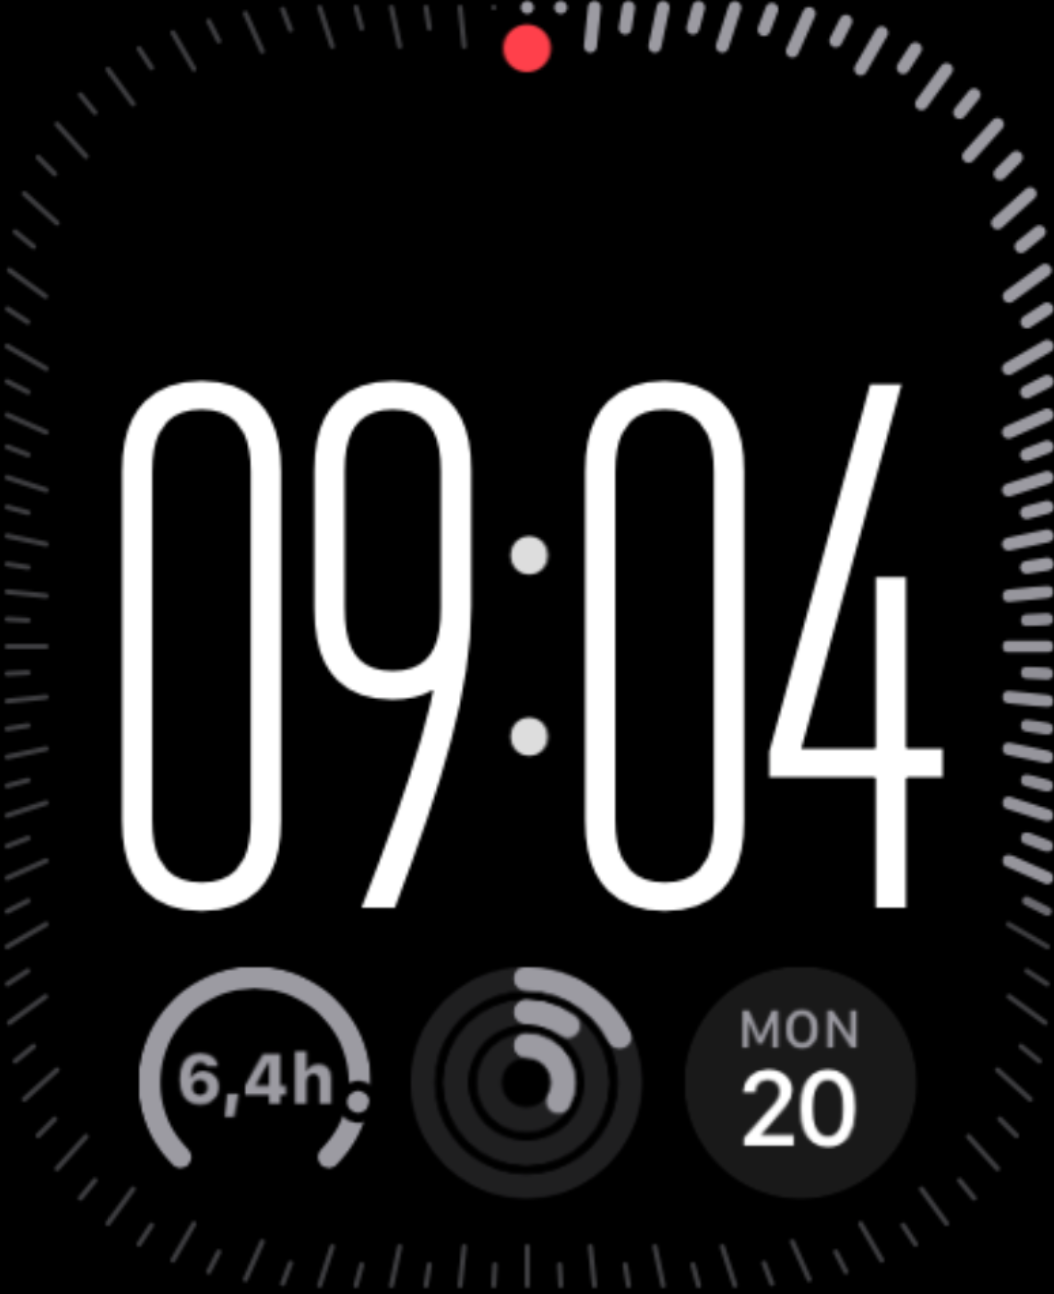
Turn the Digital Crown to scrub through any price — the hours update live as you scroll. The result tints based on how significant the cost is: softer for light purchases, deeper for bigger decisions.
Tap the plus circle (top-right corner) to log the check to your iPhone History. It syncs automatically, even if your phone isn't nearby. Your hourly rate syncs from your iPhone profile — no separate setup needed.
If your rate is more than 24 hours out of date, a small dot appears. Open the iPhone app to refresh it.
Press and hold your watch face, then tap Edit → Smart Stack and add Earned. The widget shows how many hours of your monthly budget you have left — green while you're under budget, amber at 80%, red when you're over.
The widget reads the budget you've set on your iPhone. If you haven't set one yet, open Settings → Profile and scroll down to the Monthly Budget section to turn it on and pick your hours.
iPhone widgets
Keep your hours in sight without opening the app. Earned ships a Home Screen widget and a Lock Screen complication.
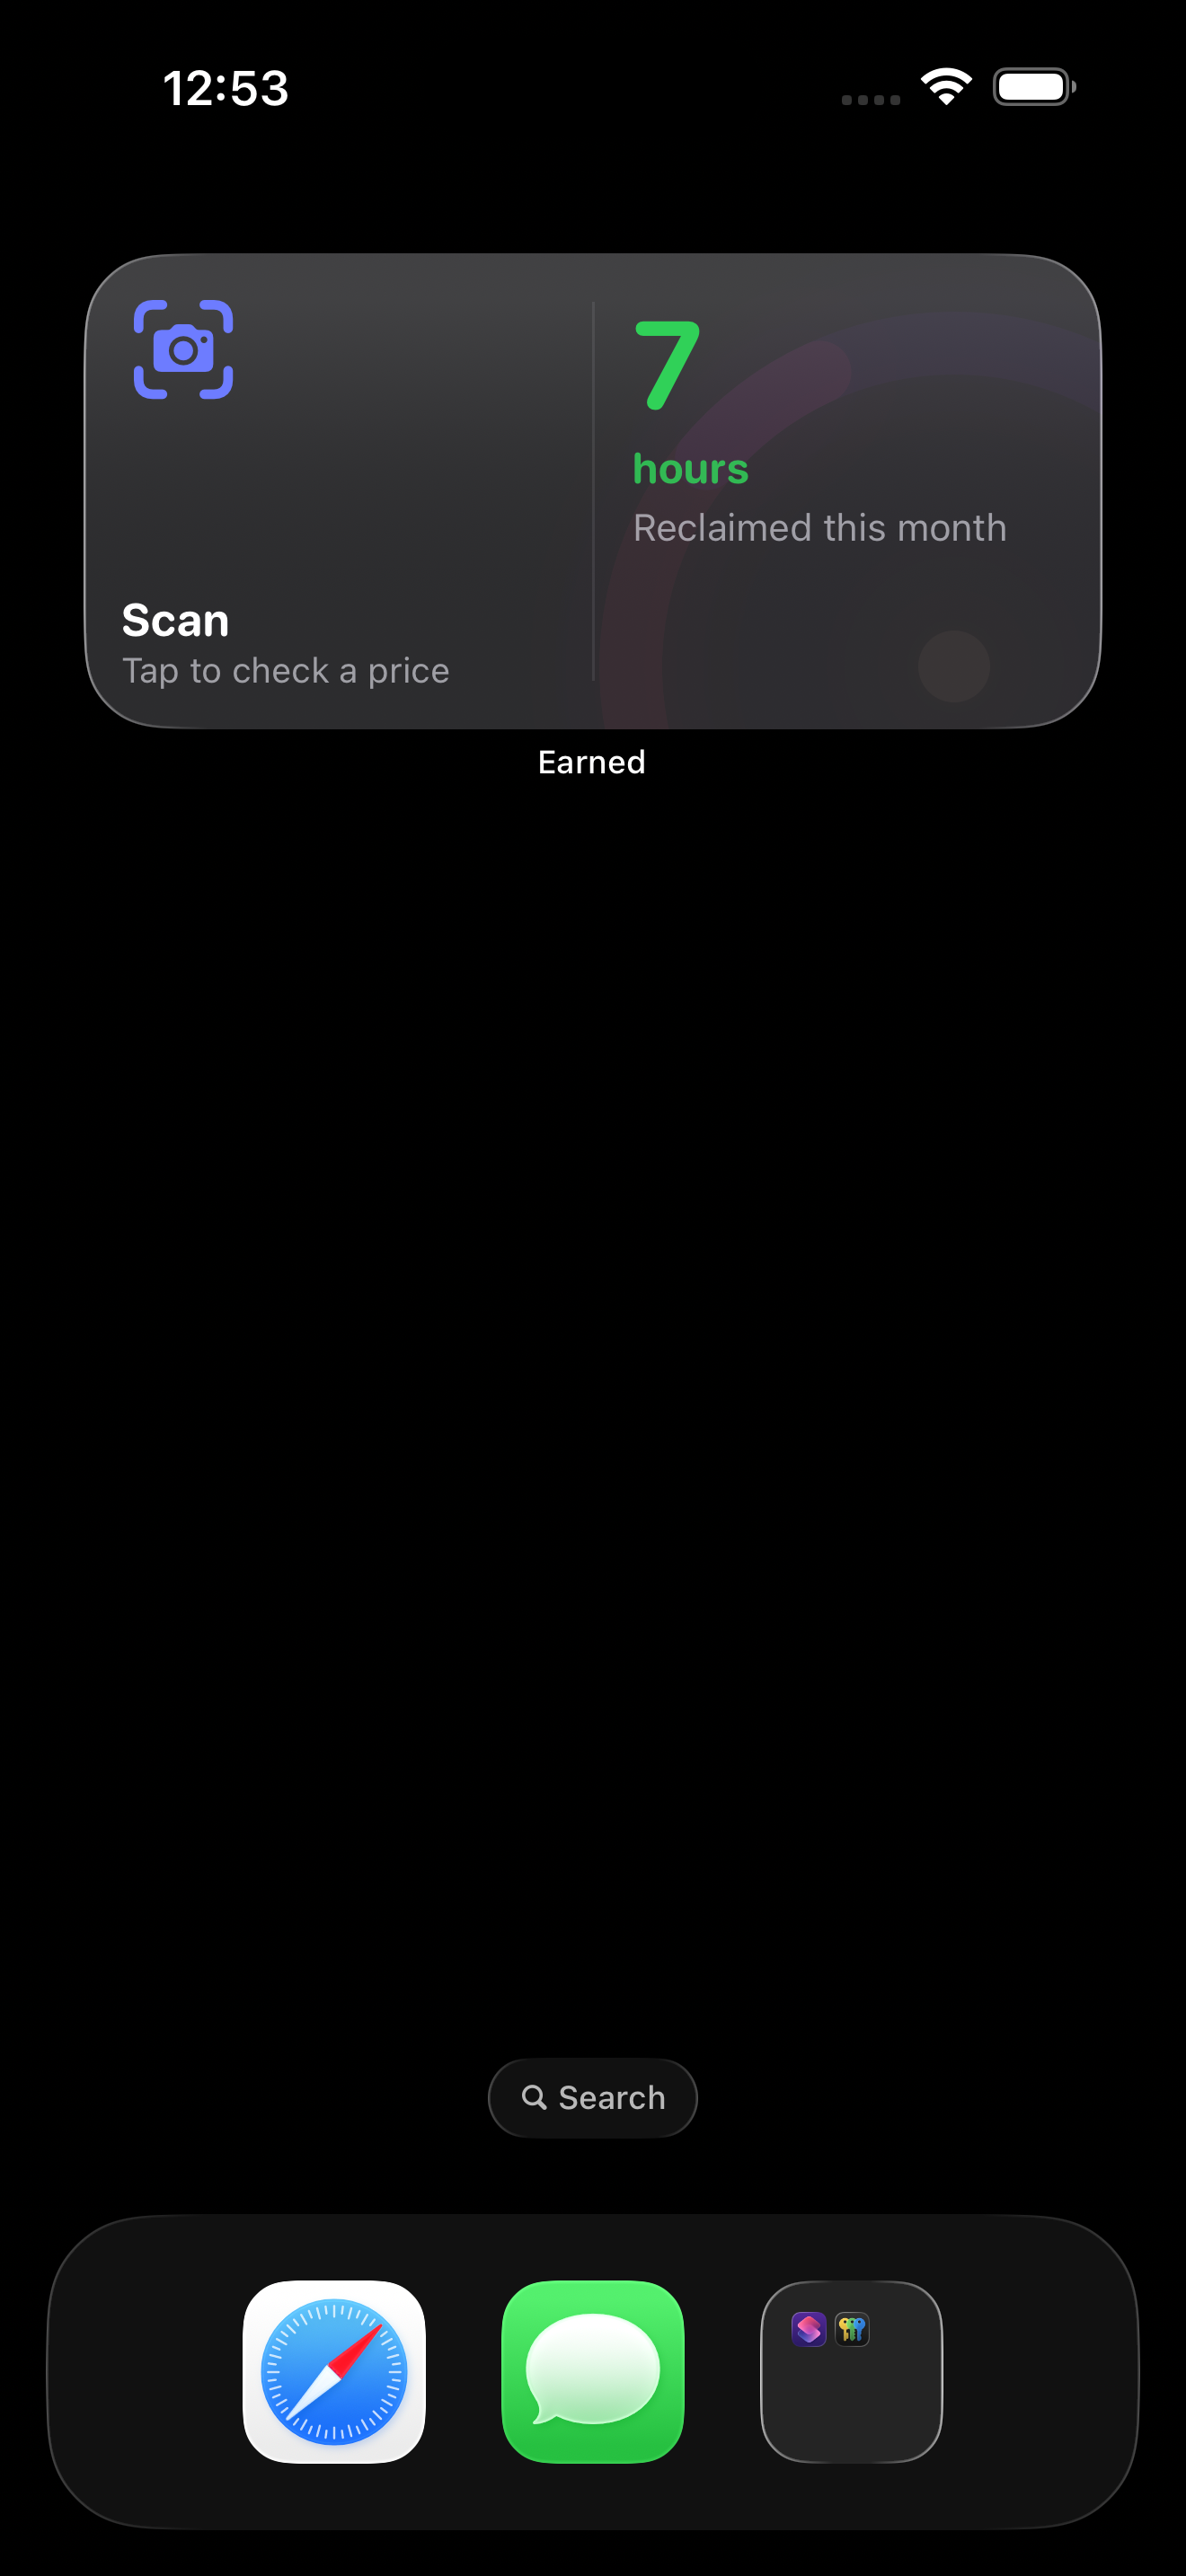
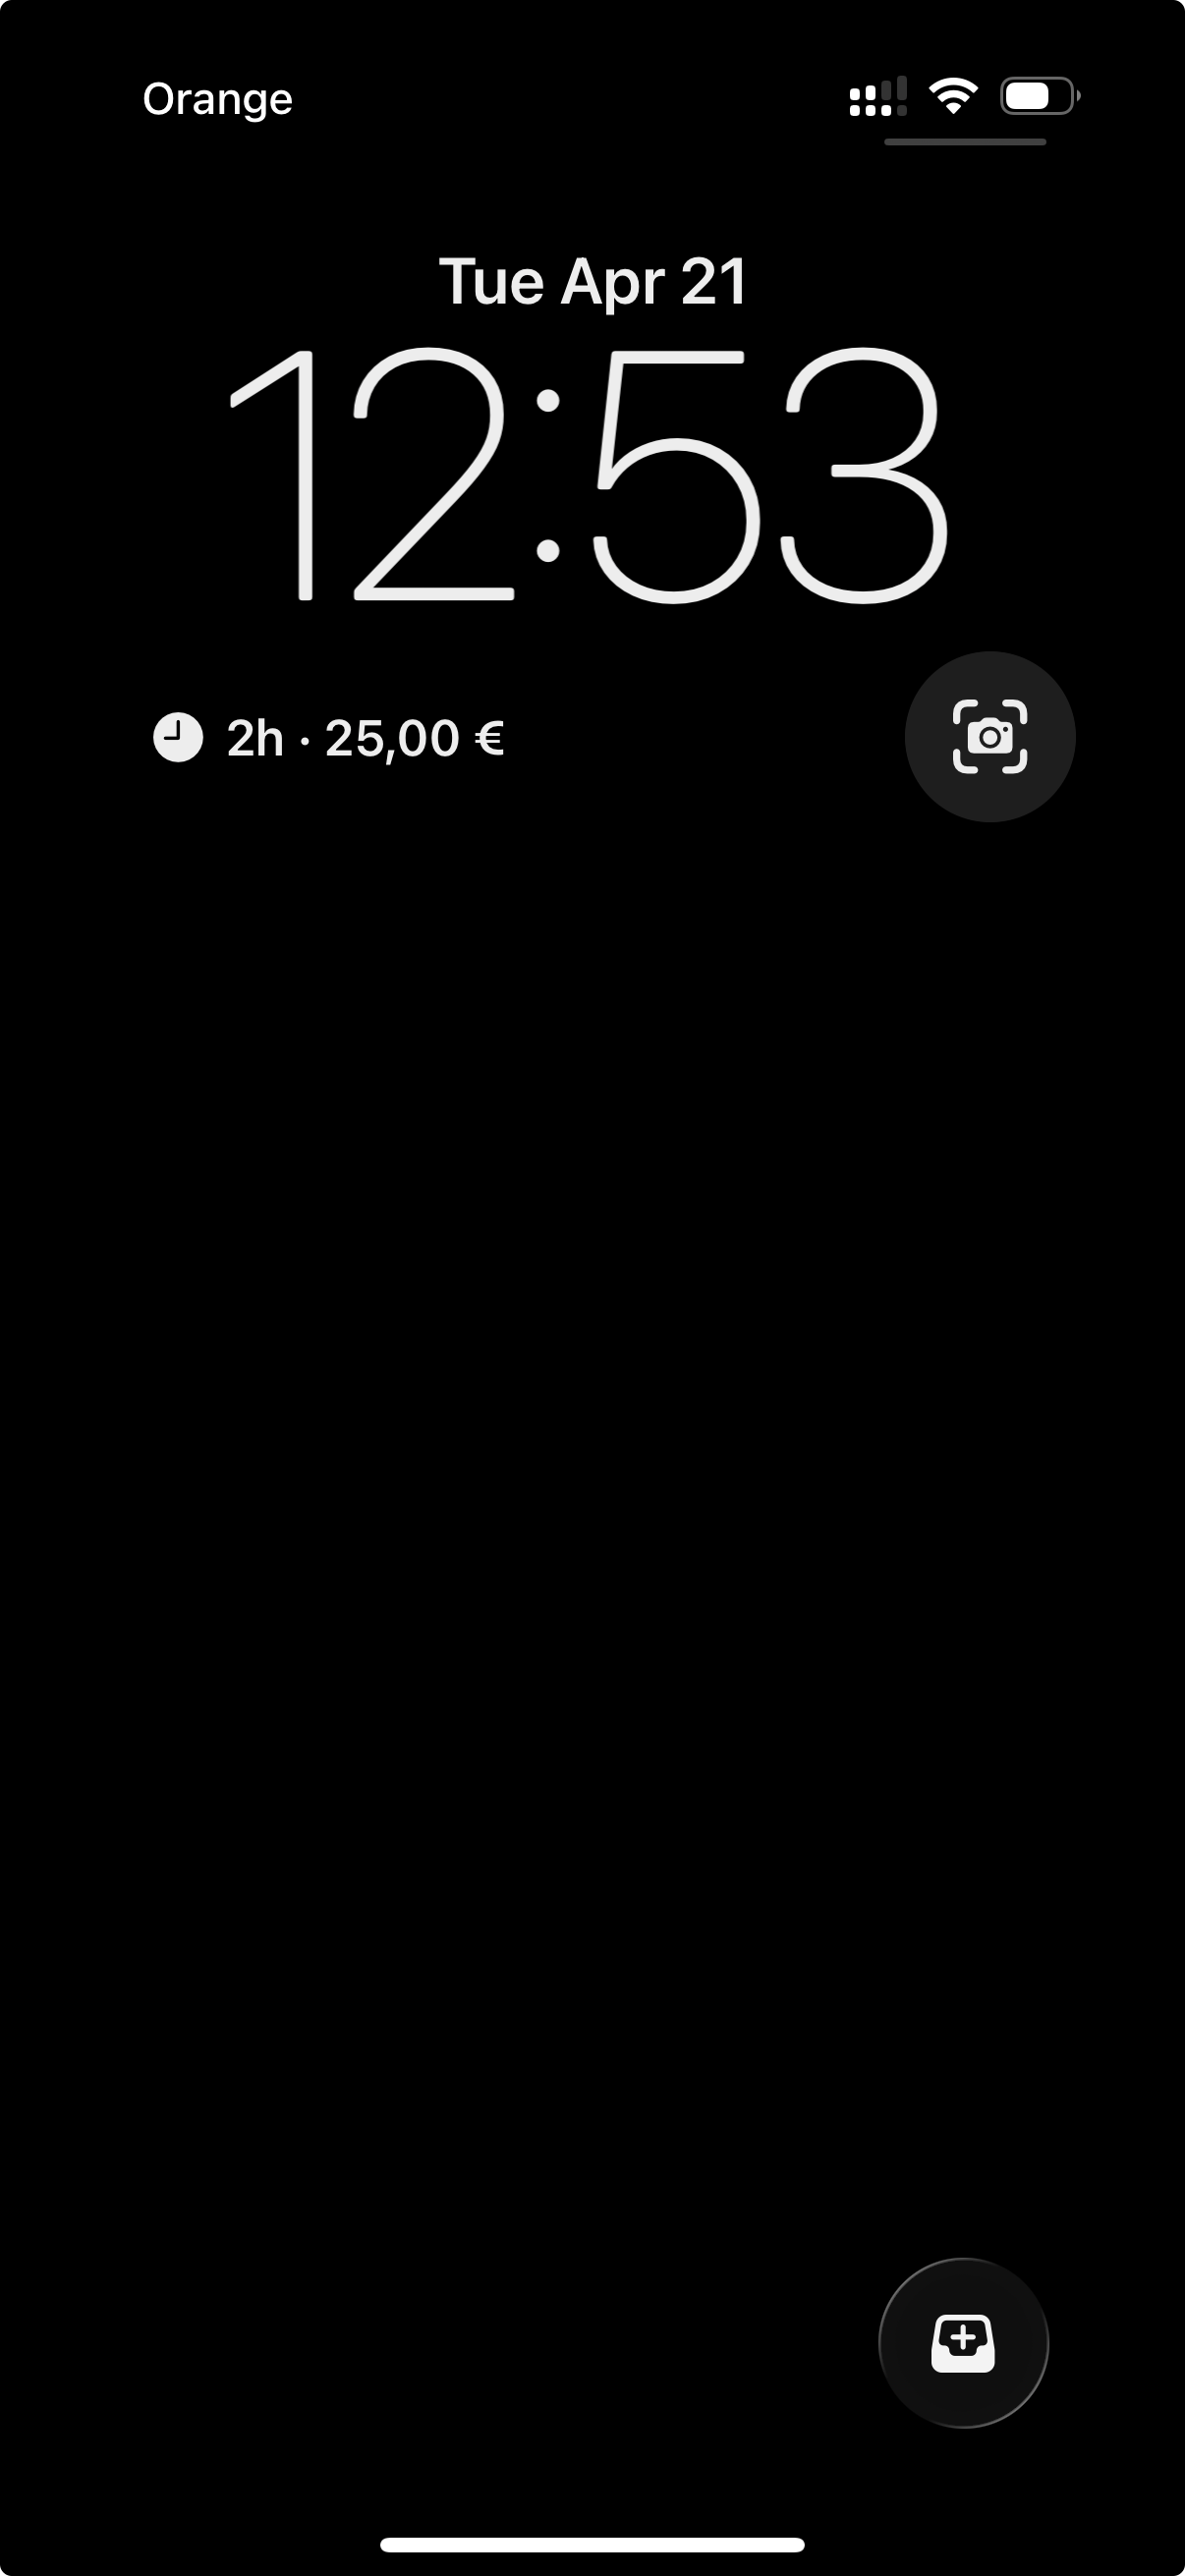
Long-press an empty spot on your Home Screen until the icons jiggle, tap Edit → Add Widget, search for Earned, then pick the size you want and tap Add Widget.
The small widget shows your last price check. The medium and large widgets show your monthly budget remaining — "X hours left this month" or "X hours over budget" — with a progress bar; the large widget also lists your three most recent decisions. Tap the budget hero to open Insights; tap a recent-decision row to open History.
The Price Scanner has its own dedicated lock-screen widget — long-press your Lock Screen, tap Customise → Lock Screen, and add the Earned scanner complication for one-tap access.
Long-press your Lock Screen, tap Customise → Lock Screen, then tap one of the widget slots under the clock and pick Earned.
You have three lock-screen options. The circular complication shows your last check — hours at a glance, mutes to grey if it's more than two weeks old. The rectangular and inline complications show your monthly budget remaining ("18h left this month" or "2h over"). Tap any of them to land in the relevant tab.
Widgets refresh automatically whenever you log or edit a check, change your rate, or open the app. Between those, iOS decides when to wake them — usually within a few minutes.
Currencies
Convert prices in 19 major currencies into your work time.
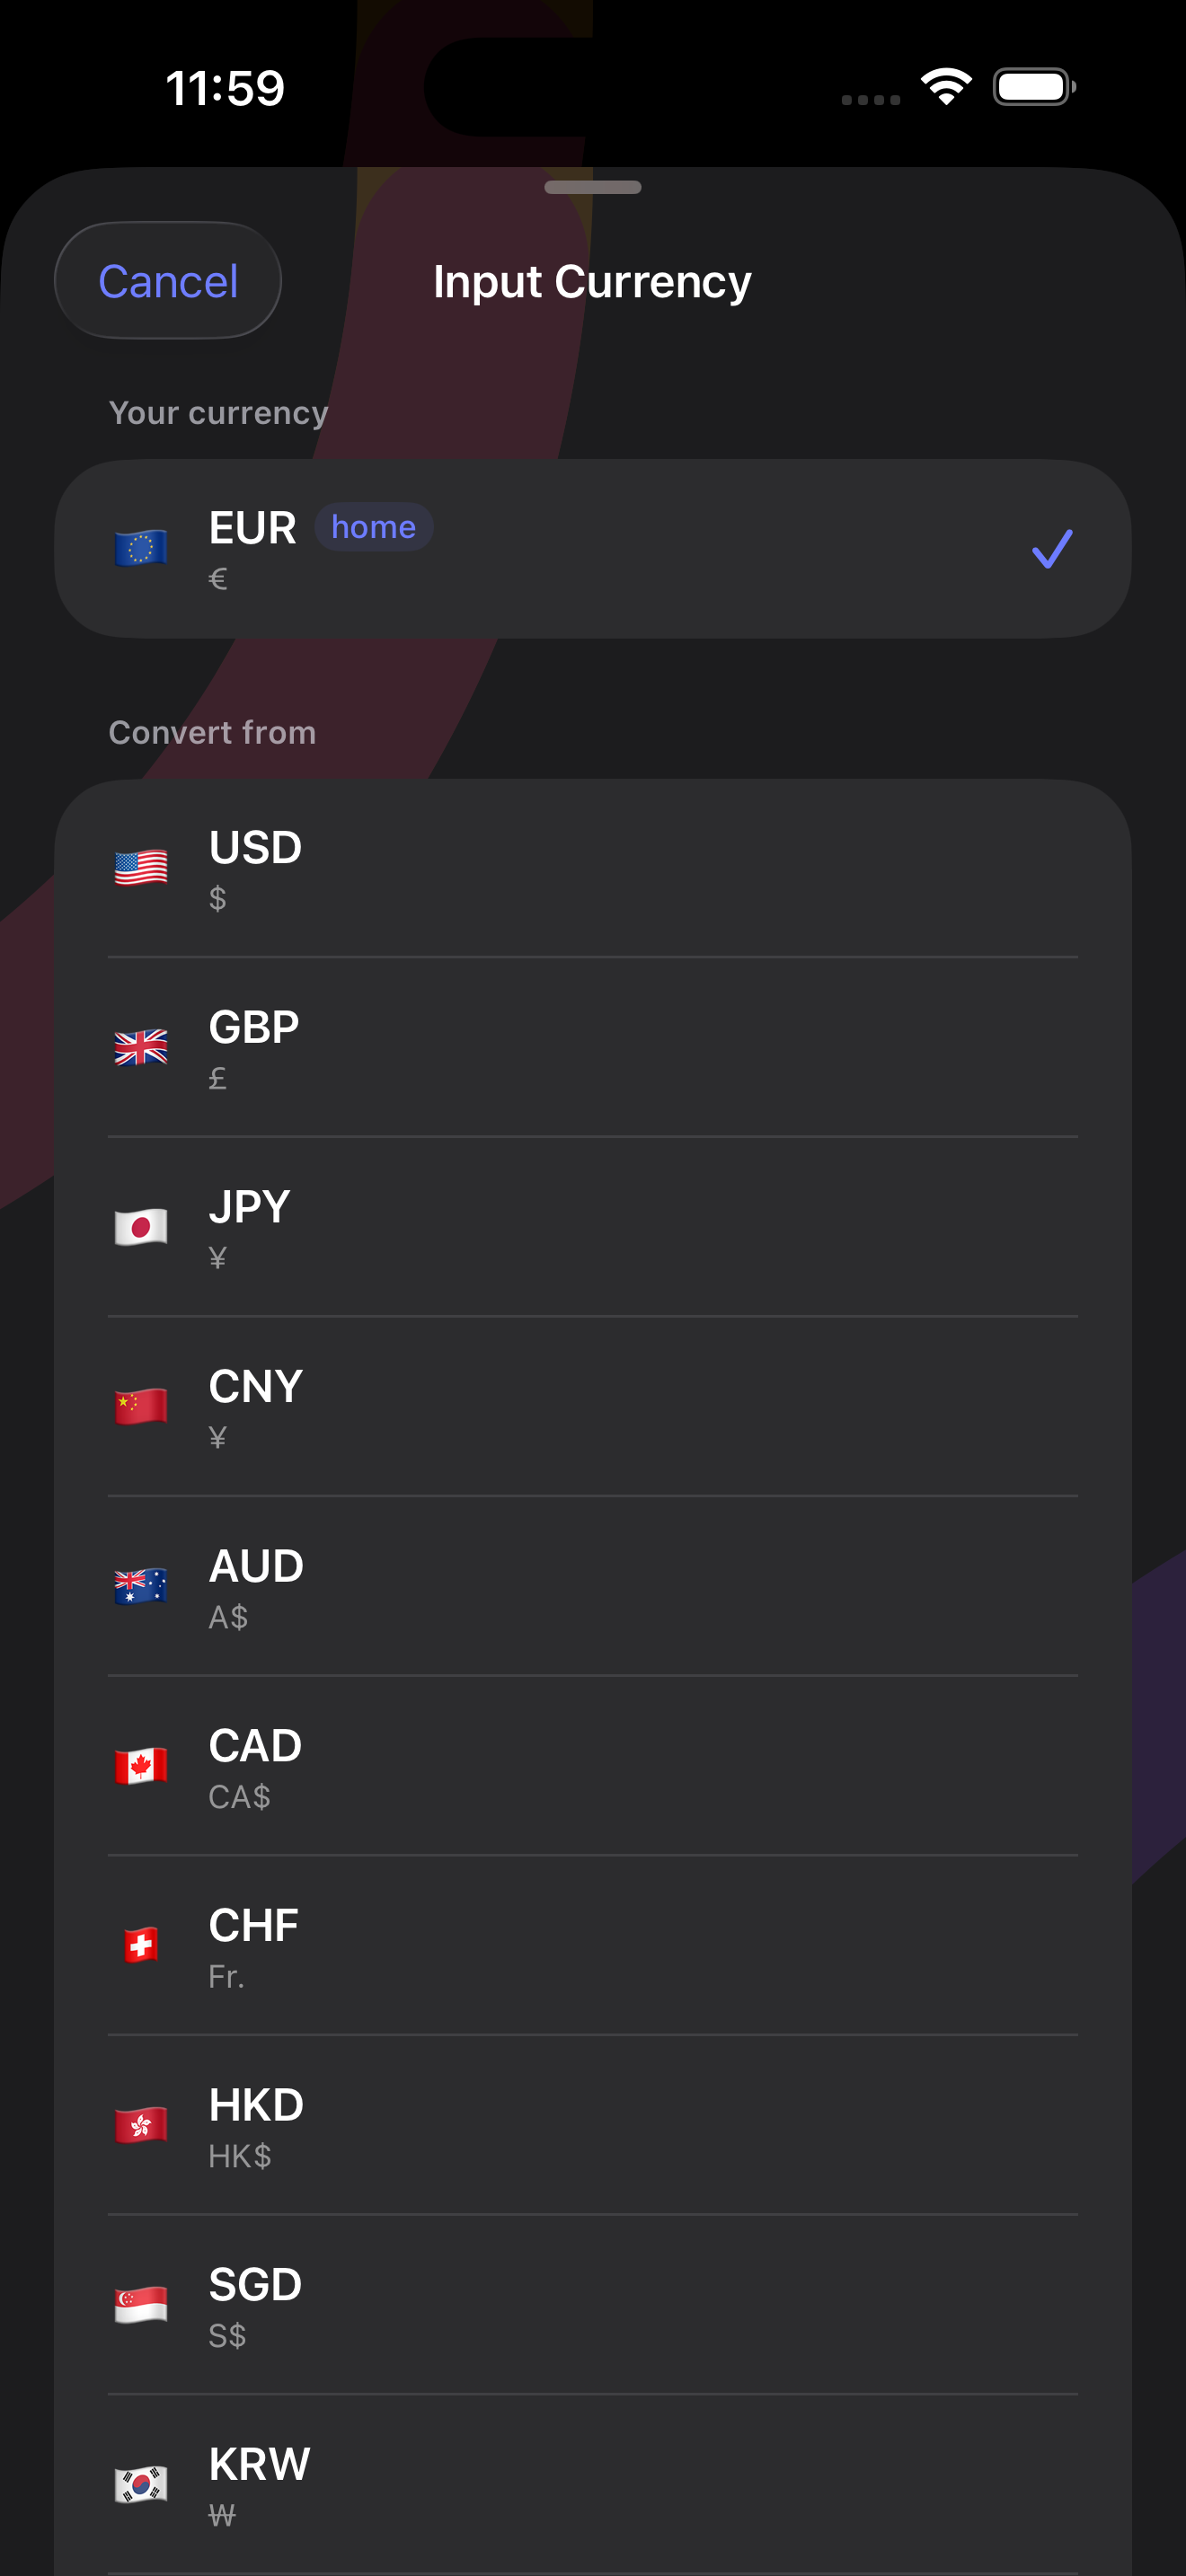
Earned supports 19 major currencies: USD, EUR, GBP, JPY, CNY, AUD, CAD, CHF, HKD, SGD, KRW, INR, BRL, MXN, SEK, NOK, PLN, CZK, HUF. Your home currency is set in Settings. In the Calculator, you can switch to any of the supported currencies to convert a foreign price — Earned will use the live exchange rate to convert it to your home currency first, then into your work time.
Yes. When you're offline and use a foreign currency, Earned falls back to its built-in exchange rates (updated with each app release). The result shows an orange ⏱ "estimated" label so you know it's an approximation. Your home currency always works with no internet required.
If you have existing purchase history, Earned will warn you before changing the currency — because the historical prices were recorded in your previous currency and the comparison would no longer be meaningful. You can cancel or confirm. If you confirm, your history is cleared.
If you have no history, the currency changes immediately with no confirmation needed.
Notifications
A daily nudge to keep your spending in check, plus smart reminders before you shop. Enable them in Settings → Notifications.
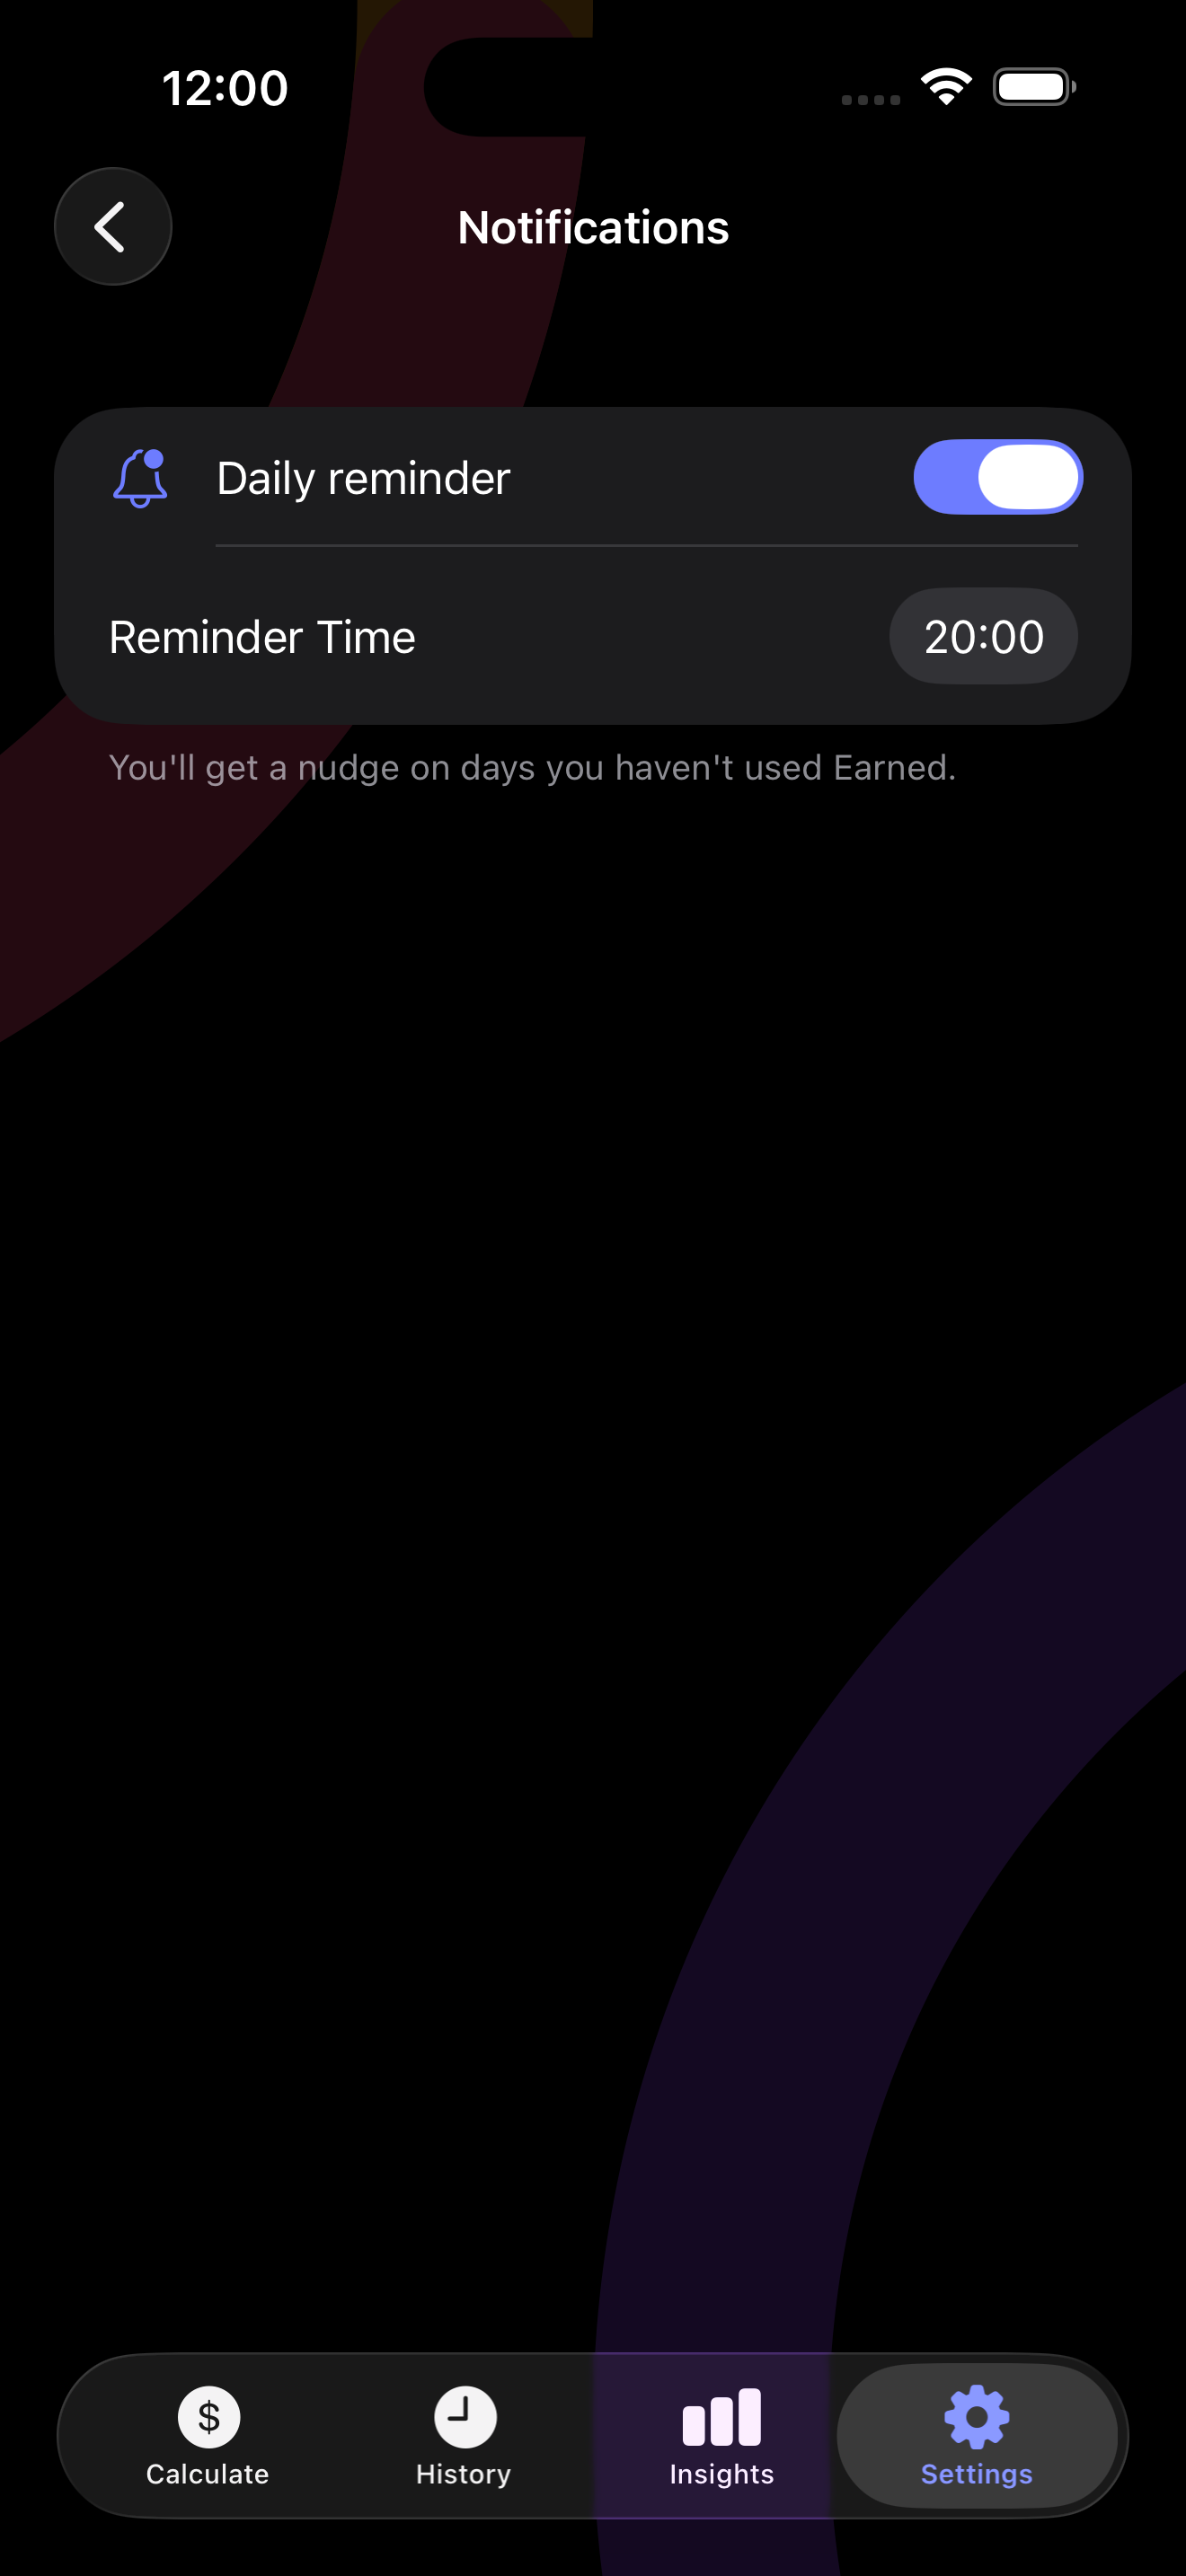
Go to Settings → Notifications and toggle on "Daily reminder". Earned will ask for permission the first time. Once enabled, you can pick exactly what time you want to be reminded each day.
A nudge that fires once a day at the time you choose (default: 8pm). It's smart — if you've already done a calculation that day, it automatically skips today and reschedules for tomorrow. You'll only ever see it on days you haven't opened the Calculator yet.
Two weekly reminders that fire at peak shopping times — Friday at 4pm and Saturday at 10am. They're a quick prompt to check the real cost before you buy something. These are included automatically when you enable the daily reminder.
Yes — go to Settings → Notifications and use the time picker to choose any hour that works for you. The change takes effect immediately.
Toggle off "Daily reminder" in Settings → Notifications. This cancels all pending reminders — both the daily nudge and the shopping reminders — immediately.
Weekly Digest
Your week, repriced in hours of your life.
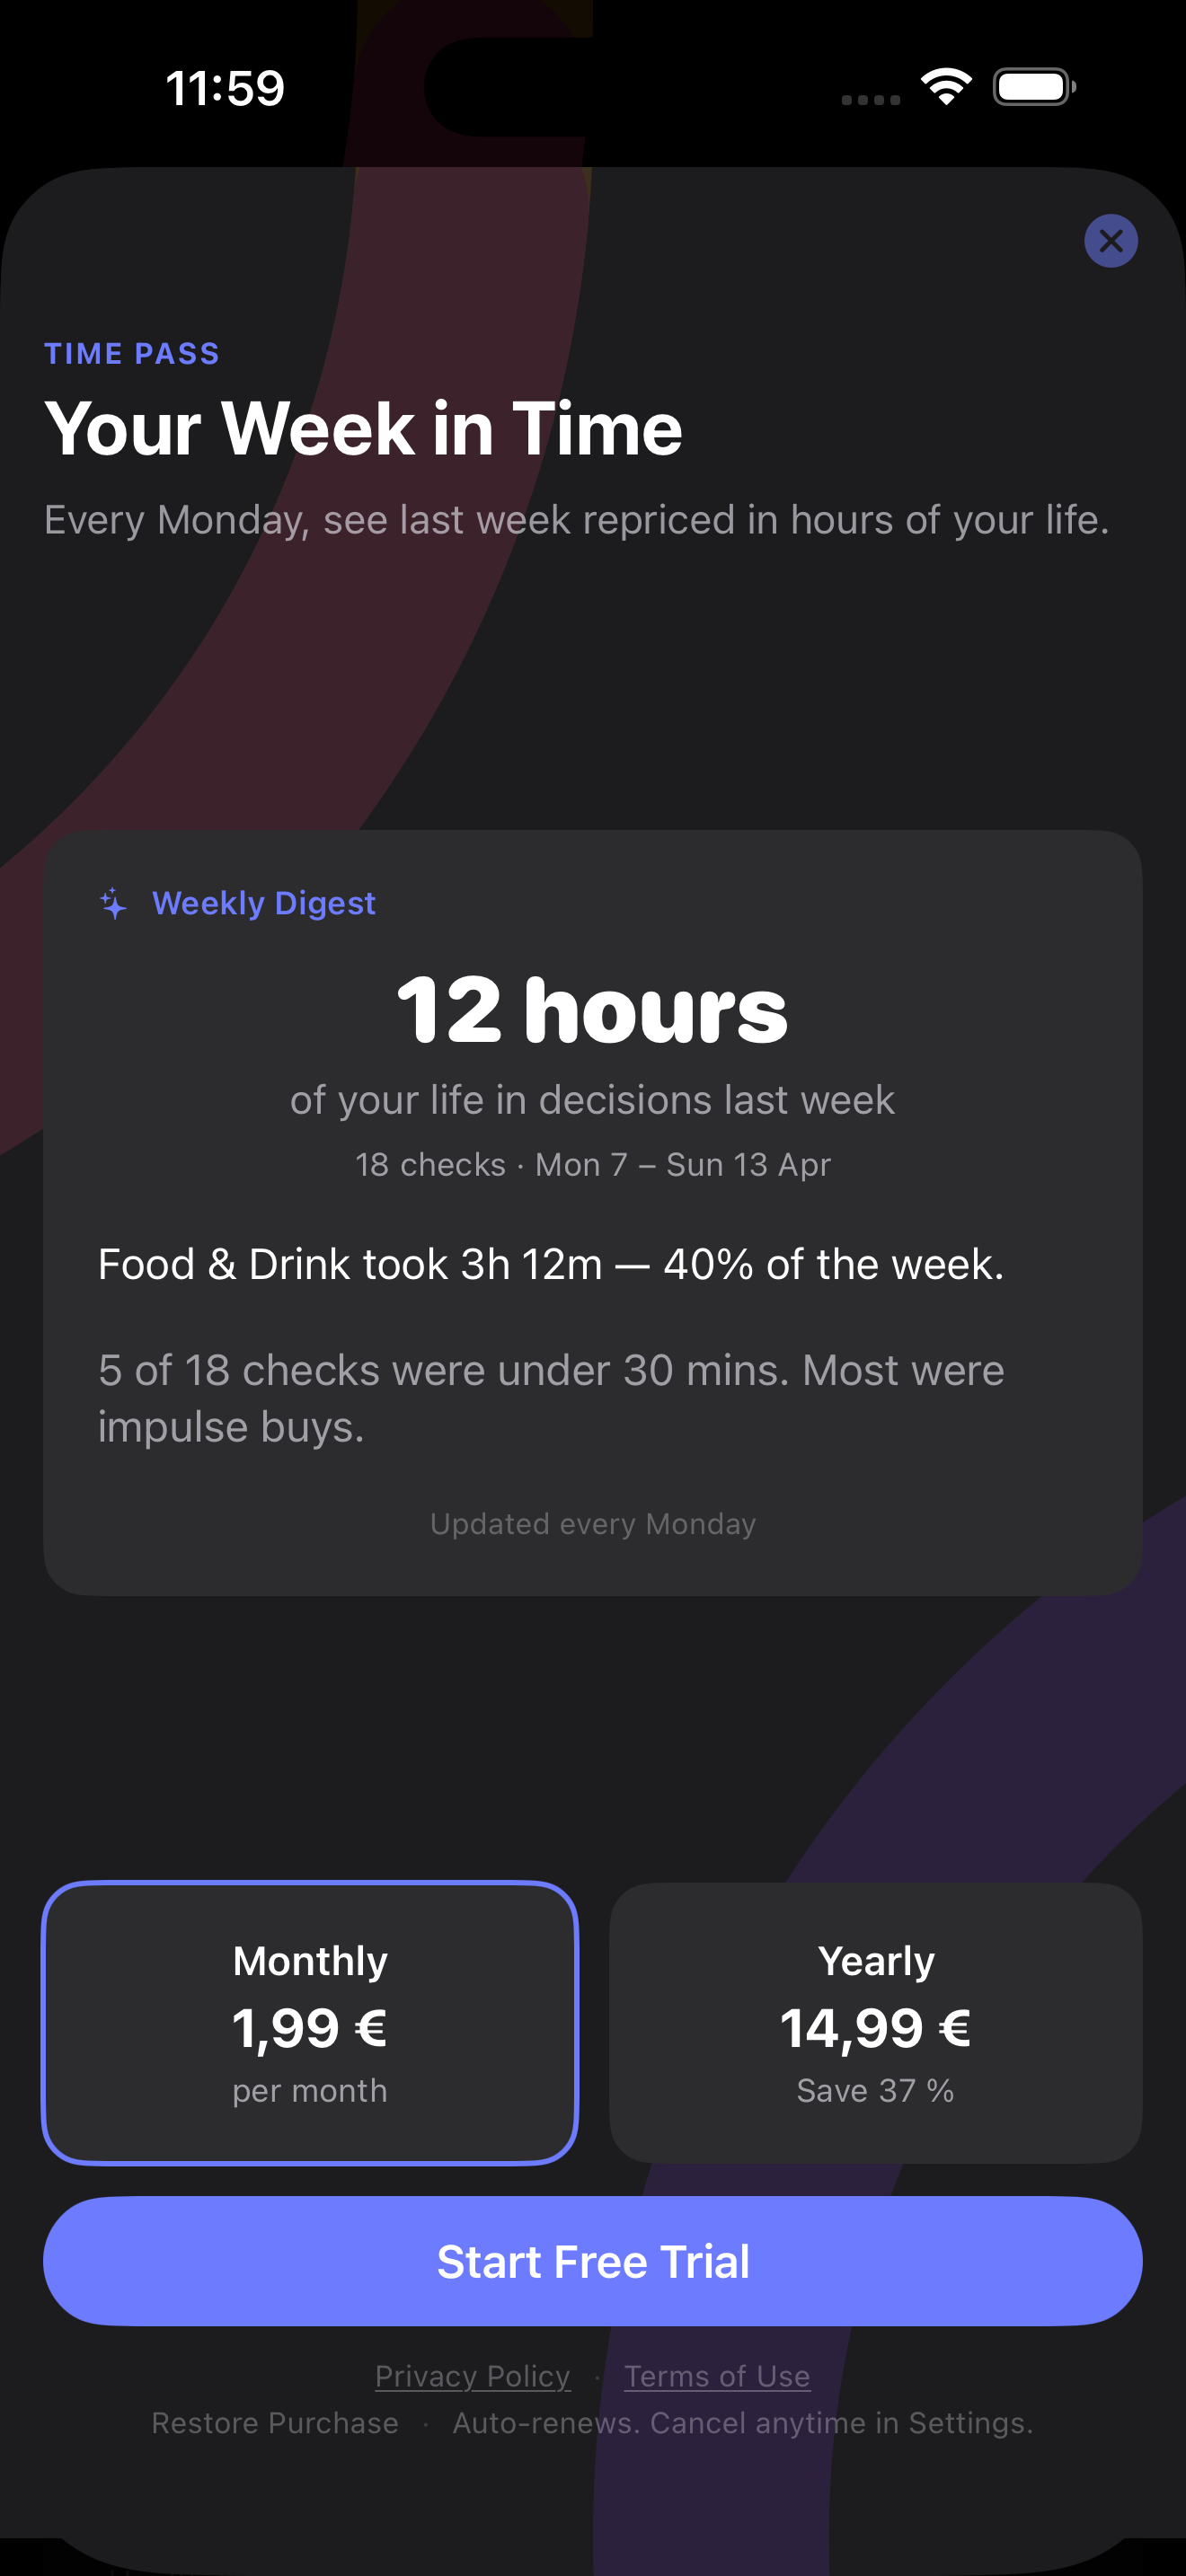
Every Monday. One screen, top to bottom in seconds — no dashboards, no scrolling.
One headline story from your week — the biggest buy, a category shift you didn't notice, or how much time-cost you walked away from by skipping. Plus up to two supporting notes.
The headline is the strongest real signal from your week, not a fixed summary count. On rich weeks you'll see something different each time.
The Weekly Digest is unlocked by Time Pass — an optional add-on, separate from the base app.
Time Pass
An optional add-on that unlocks the Weekly Digest and future AI features.
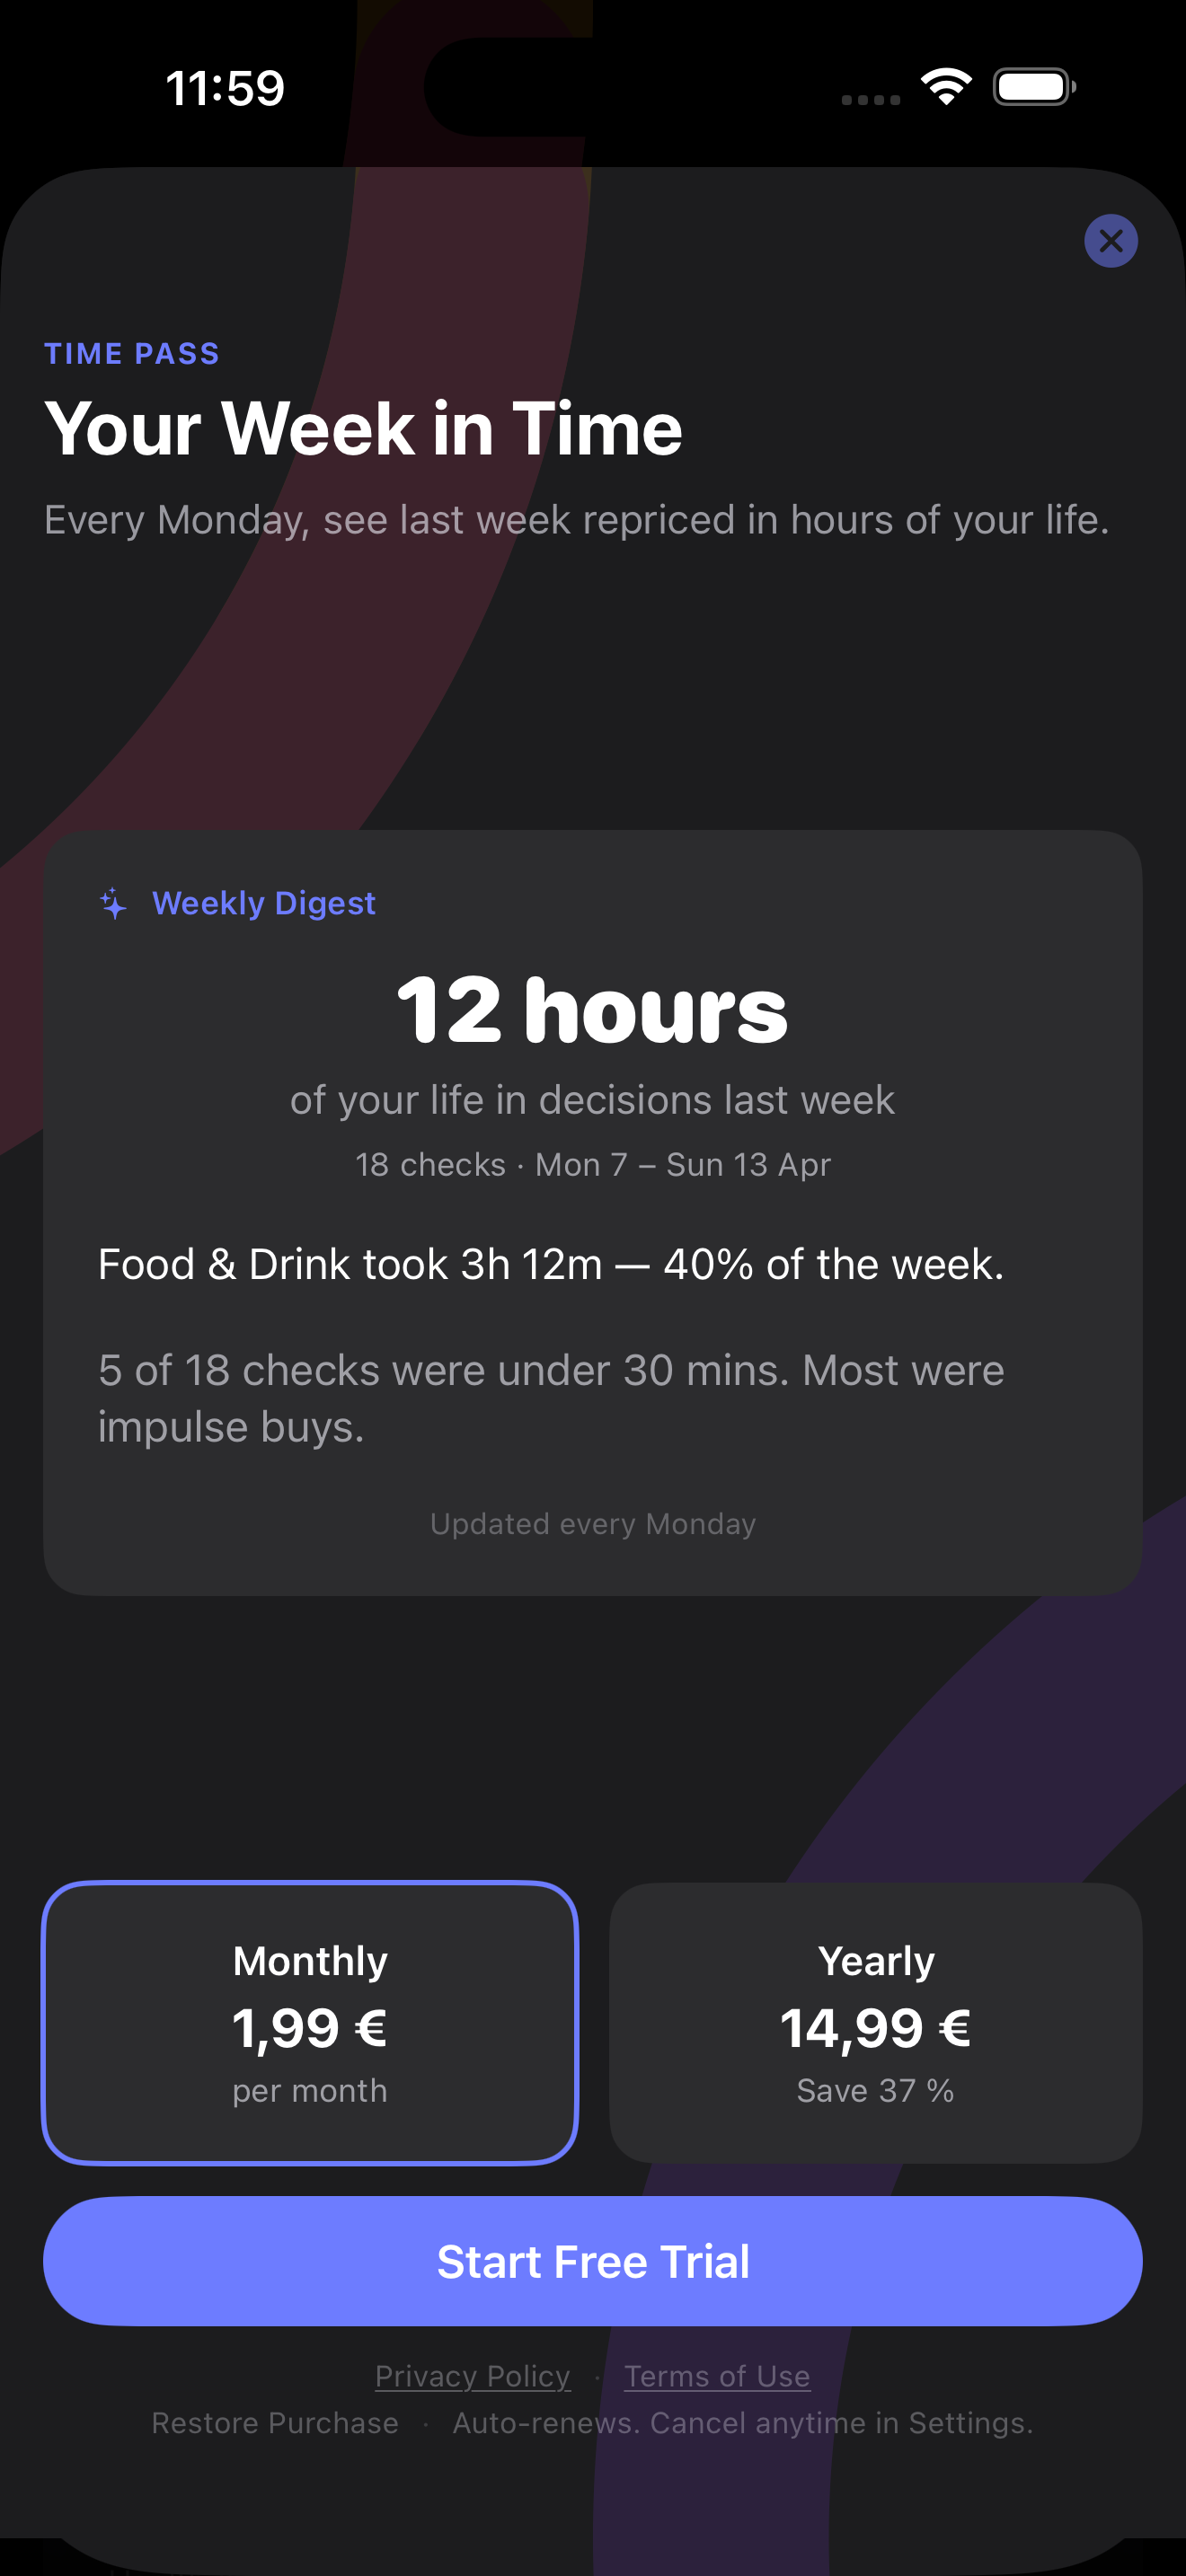
The Weekly Digest, plus any AI features added later. That's it.
Core Earned — calculator, history, insights, budget, watch, widget, custom comparisons — stays free once you've bought the app. Time Pass is additive, not a paywall for features you already use.
Monthly is $1.99, yearly is $14.99 with a 7-day free trial on the yearly plan. Prices adapt to your App Store region, so the price you see in the app is the price you'll pay.
Once 1.73.4 ships, you'll also be able to open Settings → Time Pass in the app to see pricing.
Settings → Time Pass → Manage Subscription opens the standard App Store sheet. You can switch plans or cancel anytime — no calls, no forms.
Cancelling keeps access until the end of the current billing period. Your Earned history, settings, and the base app are unaffected.
The Weekly Digest is composed on your device from your own history. What leaves the device for AI features is disclosed in the Privacy Policy in Settings → About, and on privacy-policy.html.
iCloud Sync & Backups
Keep your data in sync across your iPhones and automatically backed up to iCloud Drive.
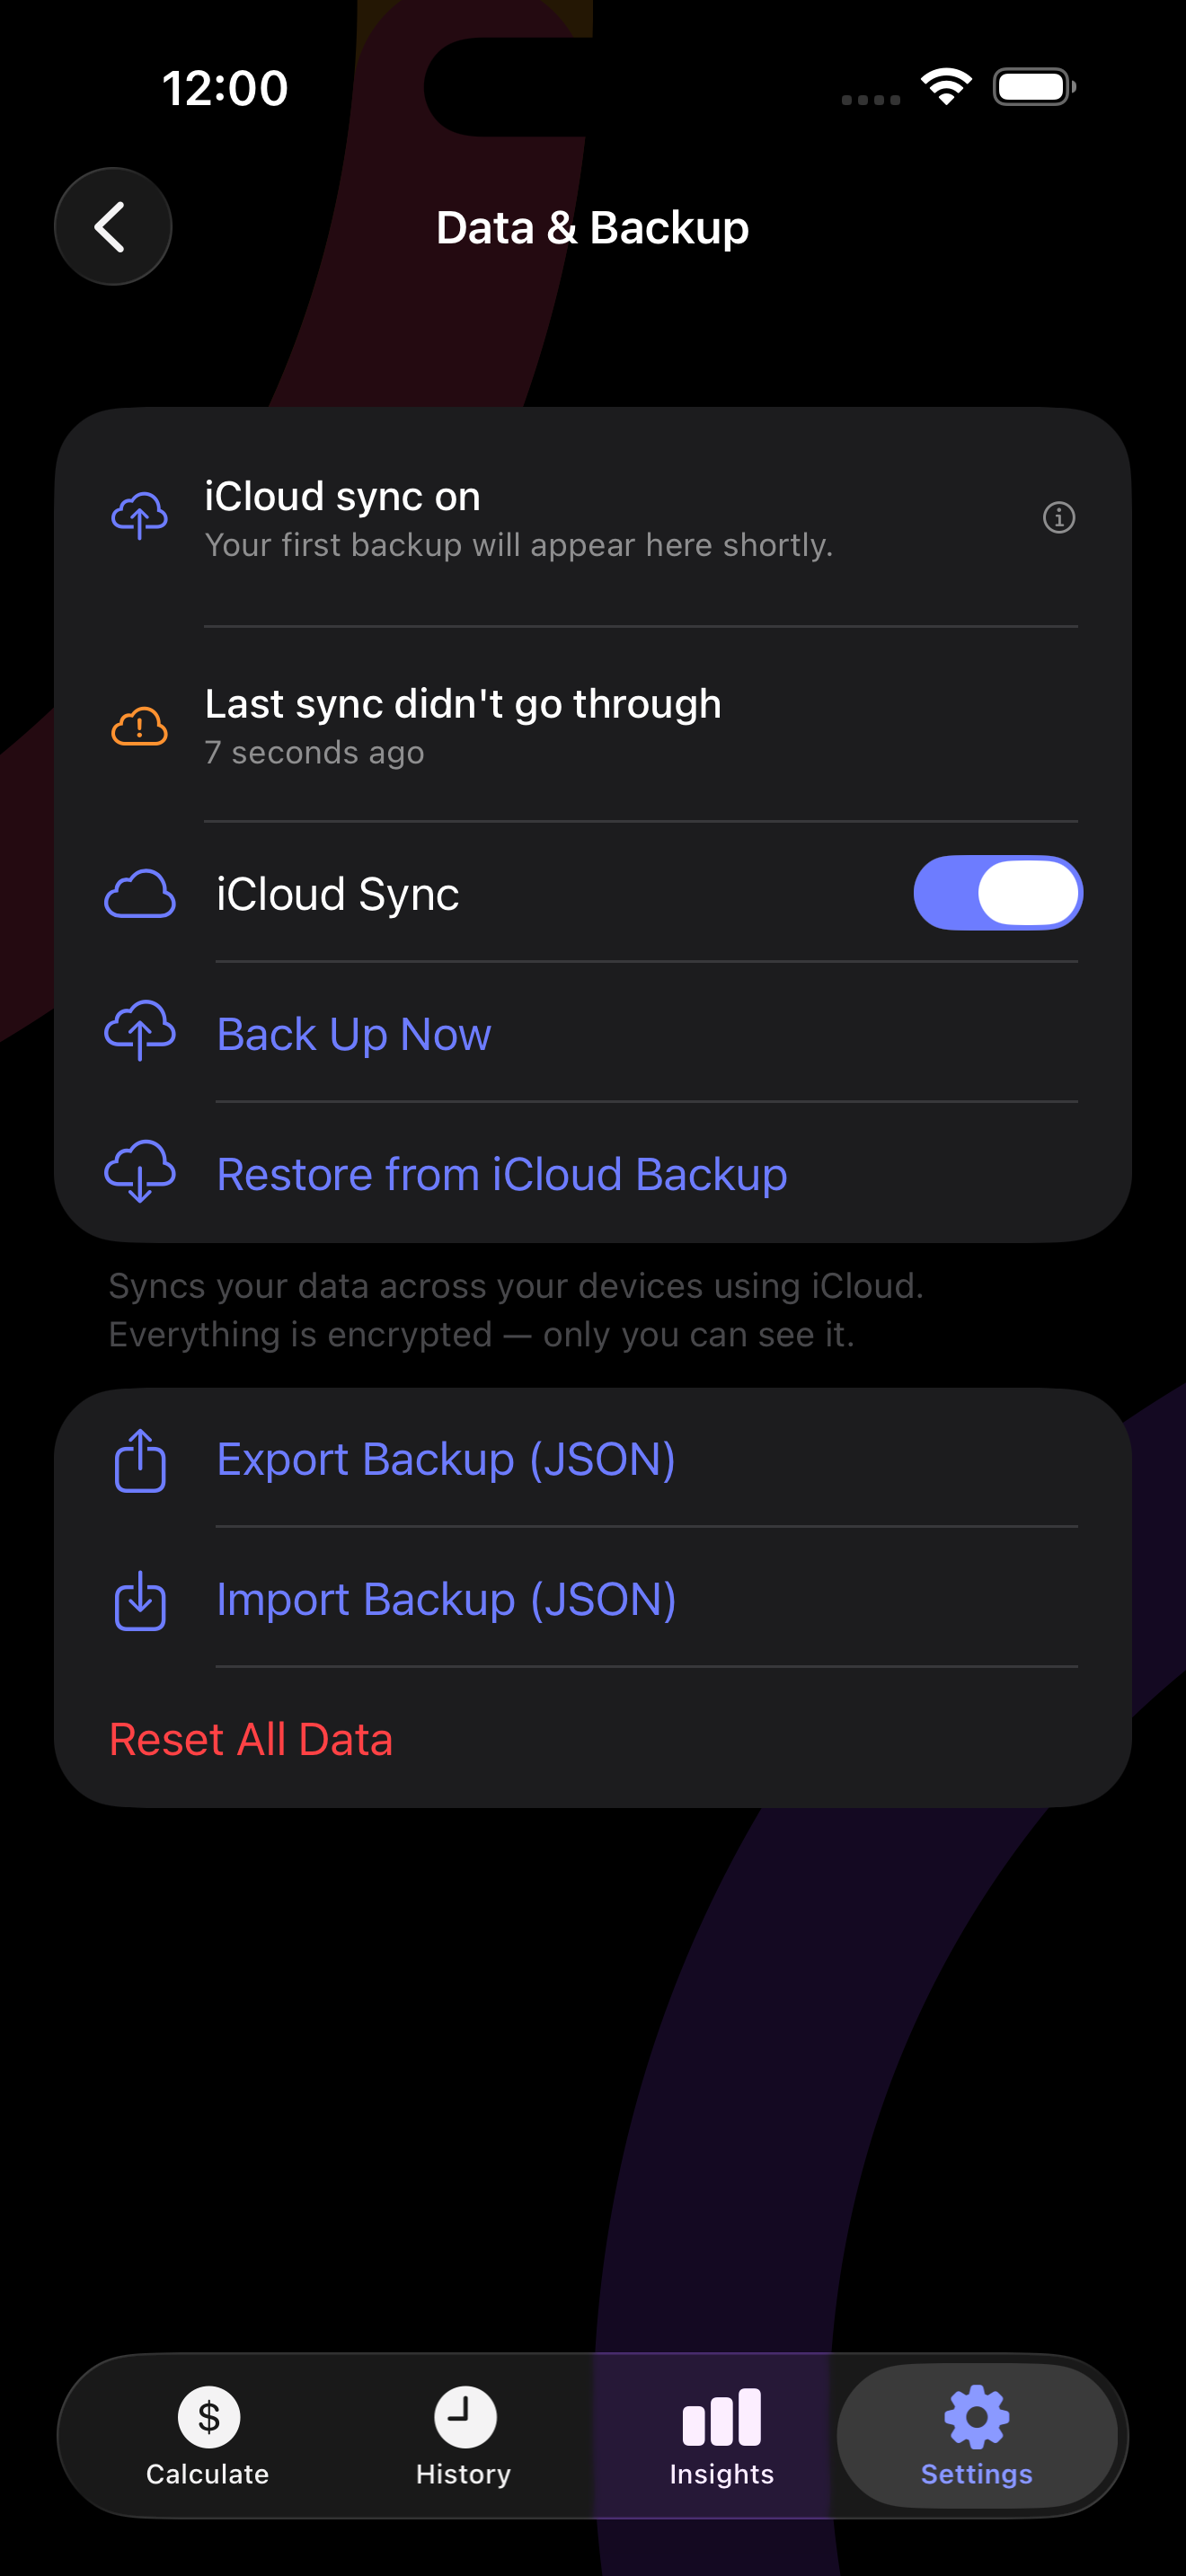
- Go to Settings → Data & Backup.
- Tap the iCloud Sync toggle.
- Tap Confirm in the prompt — your data starts syncing immediately.
Any other iPhone signed into the same Apple ID with Earned installed will sync automatically. The first sync may take a moment. Settings shows a live status so you always know when your data was last synced.
No. iCloud Sync is completely optional. By default, all your data stays on your device only. If you don't enable iCloud Sync, your data never leaves your iPhone.
Earned automatically saves a backup to your iCloud Drive once a day. The last 7 automatic backups are kept — older ones are removed automatically. Backups work independently of iCloud Sync, so even if you don't sync across devices, your data is still backed up to iCloud Drive.
You can also create a manual backup any time from Settings → Data & Backup → Back Up Now. Manual backups are kept forever — they're never auto-deleted.
There are two ways to restore:
- During onboarding — on the "Already use Earned?" screen, your backups appear automatically. Tap one to restore it.
- From Settings — go to Settings → Data & Backup → Restore Backup and tap any backup in the list.
Restoring replaces your current data with the backup — your existing history and profile will be overwritten.
Go to Settings → Data & Backup → Restore Backup, then swipe left on any backup row and tap Delete. You'll be asked to confirm before anything is removed.
Settings → Data & Backup shows a live status row when iCloud Sync is on:
- Last synced — the last time a sync completed successfully, shown as a relative time ("2 minutes ago").
- Syncing — a sync is currently in progress.
- Last sync didn't go through — the most recent attempt failed. Usually resolves on its own; check your iCloud account in iOS Settings if it persists.
- Sync idle — no sync has happened yet this session, usually right after launch.
- iCloud unavailable — the app couldn't connect to CloudKit and is running locally. Your data is safe on this device. Check that iCloud Drive is enabled for Earned in iOS Settings → [your name] → iCloud.
Privacy & Data
Your data is yours — we don't collect it.
No. Your income, purchase history, budget, and settings are stored only on your device using Apple's SwiftData framework. We have no advertising infrastructure and no third-party data sharing.
There are two optional exceptions, both off by default, both entirely under your control:
iCloud Sync — uses your own iCloud account to sync data between your personal devices. We never see any of it.
Anonymous Analytics — a new opt-in toggle in Settings → Analytics sends a small set of count-only signals (like "app launched" or "check saved") so we can see which features are actually used. Prices, amounts, income, and item names never leave your device — even when the toggle is on. See the Analytics FAQ below for the full detail.
Only count-only events from a fixed list of 12 event names — things like app launched, calculator result shown, check saved, decision made, onboarding step reached, budget toggled. Each event is paired with a day-level UTC date, a rotating anonymous install ID, and coarse context (app version, build, iOS major version, device model, device language).
What is never sent: prices, amounts, income, hourly rate, currency values, item names, purchase history, budget numbers, ratings, locations, IP addresses, device identifiers, or advertising IDs.
The toggle is off by default. You can read the full event list and the exact context fields inside the app by tapping the ⓘ next to the toggle, or in Section 7 of the Privacy Policy.
Everything stops, immediately and silently. Earned wipes the queued events and the anonymous install ID from your device in the same moment you flip the toggle off. There's no farewell ping and no final flush. If you flip it back on later, a brand-new random ID is generated so nothing links your old signals to your new ones.
All your data is deleted with the app. If you have iCloud Sync enabled, a copy exists in your iCloud account — you can delete it from iPhone Settings → Apple Account → iCloud → Manage Account Storage.
We recommend exporting a backup before deleting if you want to keep your history.
Troubleshooting
Common issues and how to fix them.
Double-check your income and currency in Settings. Make sure the income period is set correctly (hourly / monthly / annual) and that your tax rate is what you expect. The effective hourly rate is displayed at the top of the Settings screen.
Earned is fully locale-aware. If your device is set to Slovak, Czech, German, or another locale that uses a comma as a decimal separator, type commas — Earned will interpret them correctly. For example, on a Slovak device, type 12,99 for €12.99.
If input doesn't seem to work as expected, make sure your iPhone's Language & Region settings match your actual locale.
Make sure you're signed into the same Apple ID on both devices, and that iCloud is enabled in iPhone Settings → Apple Account → iCloud. Then open Earned on both devices and wait a moment — sync can take a minute.
If it still doesn't sync, try toggling iCloud Sync off and back on in Earned Settings.
Please report it here — it really helps. Include your iOS version and steps to reproduce if you can. You can also attach a screenshot.
Prefer email? Write to hello@jaam.group and we'll take it from there.
Still have a question?
Can't find what you're looking for? We're happy to help.